Physical Address
304 North Cardinal St.
Dorchester Center, MA 02124
Physical Address
304 North Cardinal St.
Dorchester Center, MA 02124

Your thermostat keeps turning off right when you need comfort the most. One minute the AC is running fine, the next minute the screen goes dark and your home starts heating up. I have talked to dozens of homeowners who face this exact frustration, and the good news is that most causes are simple to identify and often free to fix.
When your thermostat keeps turning off, the culprit is rarely the thermostat itself. Through my research into HVAC forums and conversations with technicians, I have learned that the problem usually lies elsewhere in your heating and cooling system. This guide will walk you through every possible cause, from the most common condensate drain issues to the more complex electrical problems, so you can get your home comfortable again.
If you need a fast answer, here are the most common reasons your thermostat shuts off by itself:
The first item on this list deserves your immediate attention. A clogged condensate drain with a tripped float switch accounts for the majority of cases where a thermostat turns off by itself during cooling season.
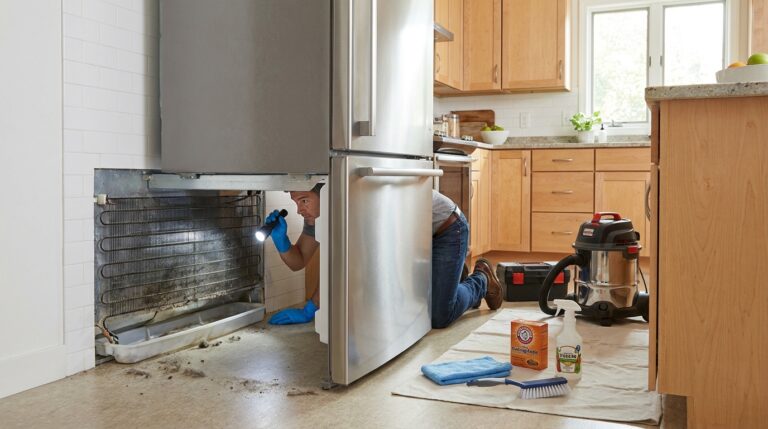
Your air conditioner removes humidity from the air as it cools. That moisture collects in a drain pan beneath your evaporator coil and flows out through a condensate drain line. When that line gets blocked, water backs up and can overflow, causing water damage to your home.
To prevent this flooding, HVAC systems include a float switch in the drain pan or inline with the drain line. This small device detects rising water levels. When water reaches a certain height, the float rises and triggers a switch that cuts power to your outdoor compressor and sometimes your entire system. Your thermostat goes dark because the power supply has been interrupted as a safety measure.
Condensate drain lines create the perfect environment for algae and biofilm growth. The constant moisture, combined with dust and organic particles from the air, allows slimy buildup to develop inside the pipe. Over months or years, this buildup narrows the passage until water cannot flow freely.
In humid climates, this problem accelerates. I have seen drain lines completely blocked after just one season of heavy AC use. The blockage might be near the air handler, or it could be at the exit point where the line dumps water outside your home.
Your system gives clear signals when the float switch activates. The thermostat screen may go completely blank or display only partially. You might hear the indoor blower running but notice the outdoor unit remains silent. Some homeowners report the system running for a few minutes, shutting off, then mysteriously starting again later. This intermittent pattern happens because water slowly drains past a partial blockage, lowering the float and resetting the switch until enough water accumulates to trip it again.
Float switches sit in two common locations. The primary switch usually installs directly in the drain pan beneath your indoor air handler. A secondary inline switch may be installed in the drain line itself, typically near where the line exits the unit. Look for a small device with wires attached and a visible float mechanism. The switch connects to your system’s low-voltage wiring and breaks the circuit when activated.
Your thermostat runs on low-voltage power supplied by a transformer in your furnace or air handler. This 24-volt circuit travels through several connection points before reaching your thermostat. Any interruption along this path causes your thermostat to lose power and shut off.
If you want to understand the wiring behind your thermostat, our thermostat wiring guide explains the color codes and connection points in detail.
Vibration from your running HVAC system gradually loosens wire connections. Terminal screws back out slightly, wire nuts loosen, and connections corrode from moisture exposure. A loose connection creates intermittent contact, causing your thermostat to flicker or shut off randomly. These failures often worsen over time, starting as brief flickers before progressing to complete shutdowns.
The transformer converts your home’s 120-volt power to the 24 volts your thermostat and control board need. Transformers can burn out from age, power surges, or overheating. When a transformer fails, your thermostat loses all power and goes completely dark. Testing for transformer output requires a multimeter and comfort working with electrical components.
Your HVAC system has multiple circuit breakers protecting different components. The indoor unit, outdoor unit, and sometimes the thermostat itself each have dedicated breakers. A short circuit or overloaded component trips the breaker, cutting power to everything downstream. Check your electrical panel for any breakers in the middle position, indicating they have tripped.
Lightning strikes and grid fluctuations send voltage spikes through your home’s wiring. These surges can damage the delicate circuitry inside smart thermostats and control boards. After a severe storm, homeowners often report thermostats that worked fine before but now keep shutting off or display erratic behavior.
Beyond drain and power issues, several other factors can cause your thermostat to turn off unexpectedly.
Battery-powered thermostats give warning signs before dying completely. You might notice a low battery icon, dimming display, or intermittent shutdowns that resolve after removing and reinserting the batteries. Replace batteries annually as preventive maintenance, even if they seem fine. Weak batteries can cause enough voltage fluctuation to trigger shutdowns without ever showing a low battery warning.
Your furnace has multiple safety switches that monitor temperature. When a dirty air filter restricts airflow, heat builds up inside the unit. High-limit switches detect this overheating and shut down the system to prevent damage or fire hazards. The thermostat may lose power or display error codes during these safety shutdowns.
If you are dealing with related cooling issues, our guide on air conditioner not blowing cold air covers filter maintenance and other common problems.
Beyond air filters, blocked vents, closed registers, or failing blower motors can cause overheating. Modern furnaces monitor multiple temperature points and will shut down completely rather than risk unsafe operation. These shutdowns often feel like thermostat problems because the display goes dark, but the root cause lies in the heating equipment.
Short cycling describes a system that starts, runs briefly, then stops before completing a full heating or cooling cycle. This rapid starting and stopping strains electrical components and can cause voltage fluctuations that reset or shut off your thermostat. Causes include oversized equipment, refrigerant leaks, or failing compressors that cannot maintain proper pressure.
Programmable thermostats follow schedules that might look like random shutdowns if you forget the programming. Smart thermostats participate in utility demand response programs that temporarily raise temperatures during peak usage. Check your thermostat’s schedule and any enrolled energy-saving programs before assuming a malfunction exists.
Different thermostat brands have unique quirks that can cause shutdown-like behavior.
For detailed Honeywell-specific troubleshooting, see our article on Honeywell thermostat not working.
Honeywell thermostats sometimes display blank screens when the internal fuse blows or when the C-wire connection loosens. Older Honeywell models are particularly sensitive to power fluctuations and may require a hard reset after outages. If your Honeywell thermostat keeps turning off after power interruptions, check the wiring connections behind the wall plate.
Nest thermostats without a C-wire use “power stealing” to charge their internal battery by briefly pulsing the heating or cooling circuits. On some systems, this method causes instability and random shutdowns. Adding a C-wire or installing the Nest Power Connector accessory often resolves these issues completely.
Ecobee thermostats require a C-wire for reliable operation. The included Power Extender Kit helps installations without an existing C-wire, but improper installation causes power issues. Ecobee units also have robust diagnostic screens that can help identify whether the problem is power-related or a system fault.
When software glitches cause erratic behavior, a factory reset often helps. Each brand has a specific button combination or menu path for resetting. Keep in mind that resets erase all programming, schedules, and WiFi connections. Document your settings before resetting so you can restore them afterward.
Before calling a professional, work through these diagnostic steps. Start with the simplest checks and only proceed to more complex steps if you feel comfortable.
Locate your indoor air handler and look at the drain pan beneath it. If you see standing water, your condensate line is clogged. Find the float switch and verify whether it has tripped. Some switches have a manual reset button you can press after clearing the blockage.
The most effective DIY fix for a clogged drain line uses a wet/dry vacuum. Find where your condensate line exits your home, usually near the outdoor unit or through a wall to a floor drain. Attach your shop vac hose to the drain line exit and seal the connection with a rag or duct tape. Run the vacuum for 30 to 60 seconds to pull out algae, sludge, and blockages. You should hear the clog clear and see water flow.
Remove your thermostat from the wall plate and check the battery compartment. Even if batteries test okay with a meter, replace them with fresh alkaline batteries. Some thermostats are picky about voltage levels and may malfunction with batteries that still work in other devices.
Pull out your furnace or air handler filter and hold it up to a light source. If you cannot see light passing through, the filter is too dirty. Replace it with a clean filter of the same size. While you have the filter out, check for any debris that might have fallen into the return duct.
Visit your electrical panel and identify the HVAC breakers. They may be labeled as furnace, air handler, AC, condenser, or heat pump. Flip each breaker fully off, then back on. Even breakers that appear on can reset internal contacts by being cycled. If any breaker trips again immediately, stop and call a professional.
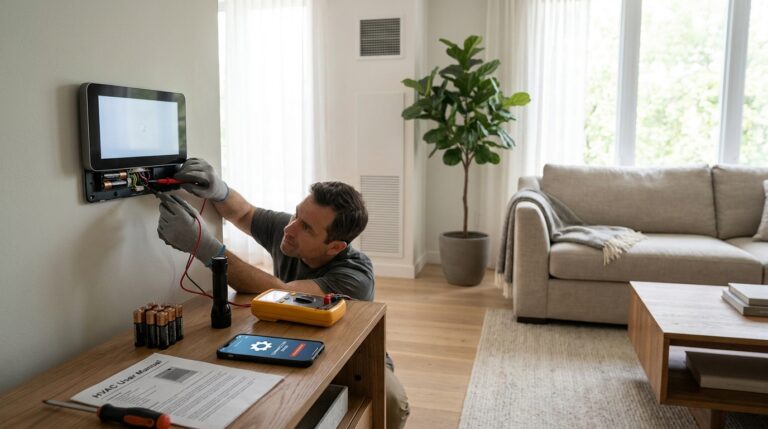
If you own a multimeter and understand electrical safety, you can check for 24-volt power at the thermostat. Remove the thermostat from the wall and set your meter to AC voltage. Touch one probe to the R wire terminal and the other to the C wire terminal. You should read approximately 24 volts. Significantly lower readings indicate power supply problems upstream.
Safety Warning: Only perform voltage testing if you are comfortable working with electrical circuits. If you are unsure, skip this step and call a technician.
Some thermostat and HVAC issues require professional expertise and equipment. Call a licensed technician if you encounter any of these situations.
Transformer replacement, control board repairs, and rewiring fall outside typical homeowner abilities. These components connect to your home’s main electrical supply and require proper training to handle safely. Incorrect repairs can damage expensive equipment or create fire hazards.
If your thermostat keeps turning off even after clearing the drain line, replacing batteries, and checking filters, the problem lies deeper in your system. Persistent issues often indicate failing components that need professional diagnosis.
Short cycling caused by low refrigerant or failing compressors requires specialized equipment to diagnose and repair. These repairs also involve EPA regulations around refrigerant handling that require professional certification.
Understanding typical costs helps you budget for professional help. Clearing a condensate drain line professionally usually costs between $75 and $150. Replacing a float switch runs $100 to $250 depending on accessibility. Transformer replacement typically falls in the $150 to $300 range. Control board repairs or replacements can cost $300 to $600 or more.
Regular maintenance prevents most thermostat shutdown issues before they start. Follow this simple schedule to keep your HVAC system reliable.
Check your air filter every month during heavy heating or cooling seasons. Replace it when it appears dirty, even if that happens before the recommended 90-day interval. A clean filter prevents overheating and reduces strain on your entire system.
Pour one cup of white vinegar down your condensate drain line every three months. The vinegar kills algae and prevents biofilm buildup. You can access the drain line through the cleanout tee near your air handler or by pouring it directly into the drain pan if accessible.
For related maintenance guidance, see our article on preventing a frozen AC unit, which covers proper airflow and maintenance practices.
Schedule a professional HVAC inspection once per year, ideally before the start of your heaviest cooling or heating season. Technicians clean coils, check refrigerant levels, test safety switches, and identify worn components before they fail. This proactive approach prevents emergency shutdowns and extends equipment life.
Ensure at least two feet of clearance around your indoor unit. Remove stored items, cleaning supplies, and anything that might block airflow or access for maintenance. Good airflow around the unit helps prevent overheating and moisture problems.
The most common cause is a clogged condensate drain line that trips the float switch safety device. When water cannot drain from your AC, the float switch cuts power to prevent flooding. Other causes include dead batteries, loose wiring connections, dirty air filters causing overheating, or tripped circuit breakers.
If your thermostat cannot stay on continuously, check for intermittent power issues. Loose wire connections, a failing transformer, or weak batteries can cause power fluctuations. Also check whether your float switch is repeatedly tripping due to a partially clogged drain line that slowly drains then refills.
Signs of a failing thermostat include inconsistent temperature readings, unresponsive buttons or touchscreen, frequent reboots or shutdowns, inability to maintain programmed schedules, and failure to trigger heating or cooling despite being set correctly. Before replacing the thermostat, rule out power supply and HVAC system issues that mimic thermostat failure.
Basic mechanical thermostats last 20 to 30 years, while digital programmable thermostats typically last 10 to 15 years. Smart thermostats may need replacement after 5 to 10 years due to software obsolescence or hardware wear. However, many thermostats that appear to fail are actually experiencing power or system issues that do not require thermostat replacement.
A float switch that repeatedly trips indicates an ongoing condensate drainage problem. The drain line may be partially clogged, allowing slow drainage that eventually backs up again. Algae buildup, improper drain line pitch, or a malfunctioning condensate pump can all cause repeated tripping. Clear the line thoroughly with a shop vac and consider adding vinegar treatments monthly to prevent recurrence.
Test a float switch by manually lifting the float while the system is running. If the system shuts off immediately, the switch mechanism works. If the switch fails to break the circuit when the float rises, or if the system runs with the float in the up position, the switch has failed and needs replacement. Also check for visible damage to the float, arm, or wiring.
Pour white vinegar into the condensate drain line through the cleanout tee, a small vertical pipe section near your indoor air handler with a removable cap. Remove the cap and pour one cup of vinegar into the opening. If you cannot locate the cleanout tee, you can carefully pour vinegar into the primary drain pan, though this is less effective for line cleaning.
When your thermostat keeps turning off, start with the most likely culprits. Check your condensate drain line and float switch first, since this accounts for the majority of cases. Replace batteries, inspect your air filter, and verify your circuit breakers before assuming the worst.
Most thermostat shutdown issues resolve with simple DIY steps that cost little or nothing. If you have worked through the troubleshooting guide and your thermostat still will not stay on, call a licensed HVAC technician. They have the tools and expertise to diagnose complex electrical issues and get your home comfortable again quickly.
Remember that regular maintenance prevents most of these problems. Mark your calendar for monthly filter checks, quarterly vinegar treatments for your drain line, and annual professional inspections. A little attention now saves you from uncomfortable shutdowns when you need heating or cooling the most.