Physical Address
304 North Cardinal St.
Dorchester Center, MA 02124
Physical Address
304 North Cardinal St.
Dorchester Center, MA 02124

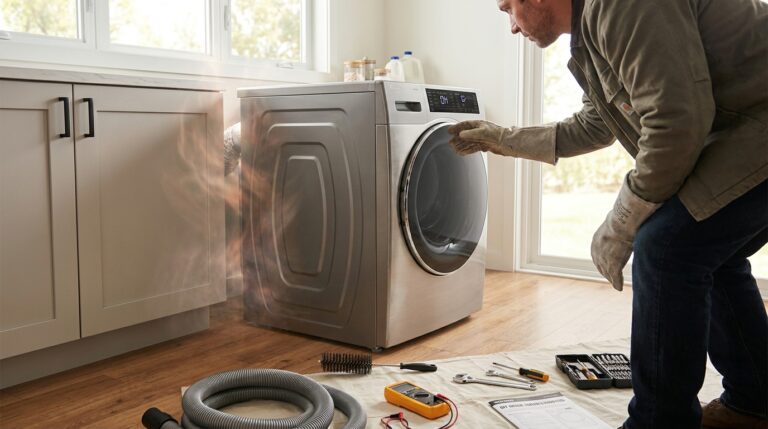
An overheating dryer is one of the most serious problems you can face with your laundry appliance. When your dryer too hot situation develops, you are not just dealing with inefficient drying or wrinkled clothes. You are facing a genuine fire hazard that demands immediate attention. I have seen dryers scorch clothing, melt internal components, and in worst cases, ignite nearby materials.
Our team has spent years troubleshooting appliance issues, and we have learned that most dryer overheating problems stem from a handful of common causes. The good news is that many of these issues can be diagnosed and fixed without calling a repair technician. This guide will walk you through recognizing the warning signs, identifying the root cause, and safely resolving the problem.
Before you begin any troubleshooting, understand this: a hot dryer can ignite lint or dust in seconds. If you notice a burning smell, see smoke, or the appliance is too hot to touch, stop immediately and unplug the unit. We will cover when to DIY and when to call a professional later in this guide.
Not every warm dryer indicates a problem. Appliances generate heat by design. However, there are clear thresholds that signal danger. The exterior cabinet should never exceed 140 degrees Fahrenheit during normal operation. If you cannot keep your hand on the top or sides for more than three seconds, you have an overheating issue.
Clothing coming out of the drum should be warm and dry, not hot to the touch. If garments feel scorching or show heat damage like shrinking, stiffening, or discoloration, your dryer is running too hot. Melted elastic on waistbands or damaged synthetic fabrics are telltale signs.
Pay attention to operational symptoms as well. A dryer getting too hot on low setting is a classic indicator of thermostat or heating element failure. If your dryer shuts off mid-cycle, the thermal fuse may be cutting power as a safety measure. Long dry times combined with excessive heat often point to restricted airflow forcing the heating element to work overtime.
The smell test is equally important. Any burning odor, even faint, means lint or dust is contacting hot surfaces. This situation can escalate to a fire within minutes. Do not ignore chemical smells, musty burning scents, or the odor of scorched fabric.
Understanding why your dryer is overheating is the first step toward fixing it. After examining hundreds of overheating cases, we have identified six primary culprits. Most are related to airflow restriction or component failure. Let us examine each cause in detail.
The most common reason for a dryer too hot situation is insufficient airflow. Your dryer removes moisture by pulling heated air through the drum and exhausting it outside. When this pathway becomes obstructed, hot air recirculates instead of escaping. The heating element continues generating heat, but the temperature inside the drum climbs dangerously high because the hot air has nowhere to go.
Check your lint filter first. Even a thin layer of lint reduces airflow by up to 30 percent. Clean it before every load. Remove the filter and wash it with warm soapy water monthly to remove fabric softener residue that traps particles. Look into the filter housing for built-up lint that has escaped past the screen.
The vent hose behind your dryer is the next inspection point. Flexible foil or plastic transition ducts crush easily and create bottlenecks. We recommend replacing these with rigid metal ducting where possible. Disconnect the hose and check for lint accumulation, bird nests, or rodent debris. The exhaust vent hood outside your home should open freely when the dryer runs and close completely when it stops. Check that the flapper moves without obstruction.
The heating element is a coiled wire that glows red hot to warm air passing through the dryer. When functioning correctly, it cycles on and off to maintain the temperature selected on your control panel. A heating element failure occurs when the coil breaks or touches the metal housing, causing a short circuit. When this happens, the element may stay on continuously rather than cycling, generating excessive heat.
Inspect the heating element for visible breaks in the coil or signs of arcing where it has touched the housing. A grounded element will often show burn marks where it contacted the metal frame. Testing with a multimeter confirms the diagnosis. A good element shows resistance between 5 and 50 ohms depending on your dryer model. Infinite resistance means the coil is broken. Continuity between the element terminals and the housing means the element is grounded and must be replaced.
The cycling thermostat monitors drum temperature and signals the heating element to turn on and off. When the temperature drops below the set point, the thermostat closes to power the element. When it reaches the target temperature, it opens to stop heating. A malfunctioning cycling thermostat can fail to open, allowing the heating element to run continuously.
This component is located near the heating element or exhaust vent. Testing requires a multimeter set to continuity. At room temperature, the thermostat should show continuity (closed circuit). As it heats, it should open and break continuity. If it never opens, or if it shows no continuity at any temperature, replacement is necessary. Some dryers use multiple thermostats for different heat settings, so check all of them if your model has several.
The blower wheel is a plastic fan that pulls air through the drum and pushes it out the vent. When this wheel cracks, loosens on its shaft, or becomes clogged with lint, airflow drops dramatically. Reduced airflow means heat cannot escape, causing the dryer to overheat even though the heating element cycles correctly.
Remove the front or rear panel to access the blower housing. Spin the wheel by hand. It should turn smoothly without wobbling or rubbing against the housing. Check for cracks radiating from the center hub, which indicate impending failure. Lint packed between the wheel vanes reduces efficiency significantly. Clean thoroughly and replace the wheel if damaged. A loose wheel that slips on the motor shaft will not generate enough airflow even if it looks intact.
The felt seals around your dryer drum create an airtight path for heated air. These fabric and foam seals attach to the front and rear bulkheads where the drum rotates. Over time, they wear down, tear, or fall off entirely. When seals fail, hot air escapes into the dryer cabinet rather than traveling through the clothes and out the vent.
This escaped heat makes the dryer exterior dangerously hot while clothes remain damp because the heated air is not passing through the drum properly. Inspect the seals by looking into the drum opening and checking the rear bulkhead if accessible. Replacement seals are inexpensive but require partial disassembly to install. If you notice hot spots on the dryer cabinet while the drum stays relatively cool, failed seals are likely the cause.
Gas and electric dryers overheat differently and require distinct troubleshooting approaches. Electric dryers use the heating element described above. Gas dryers use a burner assembly with an igniter, gas valve, and flame sensor. A gas dryer too hot situation often stems from a stuck gas valve that remains open continuously, or a faulty flame sensor that cannot detect when the burner should shut off.
Gas dryers also present additional safety concerns. Poor venting can cause carbon monoxide buildup inside your home. The burner requires precise air mixture to burn cleanly. If you have a gas dryer showing any overheating symptoms, we recommend calling a professional technician. Gas valve repair involves working with combustible fuel lines and requires specialized knowledge. Follow electrical safety guidelines when working on either type, but respect the added complexity of gas appliances.
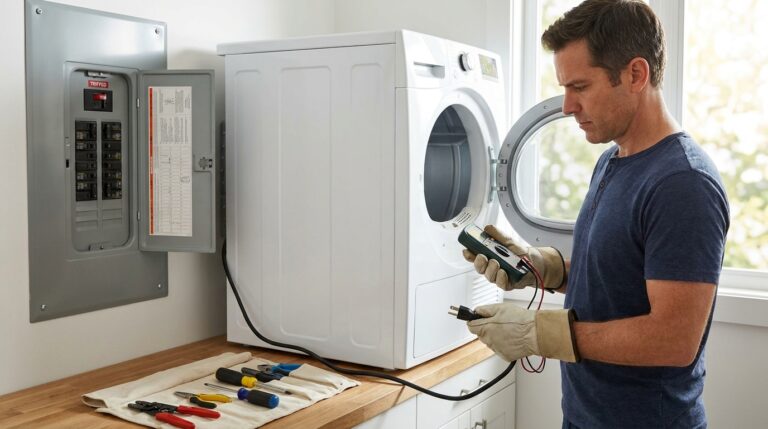
Follow this systematic approach to identify why your dryer is overheating. Work safely and never bypass thermal fuses or safety thermostats during testing. These components protect your home from fire.
Unplug the dryer from the electrical outlet. For gas dryers, also shut off the gas supply valve. If you have been running the dryer, allow it to cool for at least 30 minutes before beginning work. The heating element and surrounding metal can cause serious burns immediately after operation.
Remove the lint filter and hold it up to a light source. If you cannot see through it, clean it thoroughly with a brush and soapy water. Shine a flashlight into the filter housing to check for accumulated lint below the filter. Use a vacuum with a crevice tool to remove any buildup. This simple step solves many overheating issues immediately.
Pull the dryer away from the wall and disconnect the vent hose. Check the hose interior for lint packed into ridges or corners. Inspect the exterior vent hood for obstructions. A good test is to run the dryer on air fluff with the hose disconnected. Feel for strong airflow at the back of the dryer. Weak airflow indicates a blower wheel problem. Strong airflow means the restriction is in your vent line, which may need professional cleaning if it runs through walls or long distances.
Access the heating element by removing the appropriate panel. Disconnect the wires and set your multimeter to the lowest ohms setting. Touch the probes to the element terminals. A reading between 5 and 50 ohms indicates a good element. No reading means the element is broken. Now touch one probe to a terminal and one to the metal housing. Any reading here means the element is grounded and touching the frame, causing continuous heating.
Locate the cycling thermostat near the heating element or blower housing. Remove the wires and test for continuity at room temperature. It should show a closed circuit. If it shows no continuity when cold, the thermostat is stuck open and your dryer would not heat at all. If you suspect it is stuck closed, carefully warm it with a hair dryer while monitoring continuity. It should open as it warms. If it never opens, replace it.
Find the blower housing, usually at the bottom front or rear of the dryer. Remove any panels necessary and visually inspect the wheel. Look for cracks, chips, or lint packed between vanes. Spin the wheel by hand. It should move freely and quietly. Any grinding noise or resistance indicates damage requiring replacement.
Inspect the drum seals at the front and rear where the drum meets the bulkheads. Look for worn, torn, or missing sections. Run your hand along the seal to feel for gaps. Hold a flashlight inside the drum and look for light escaping around the seals, which indicates air leakage. Damaged seals require replacement to restore proper airflow.
Preventing your dryer from overheating is far easier than fixing the damage after it happens. Implement these practices to keep your appliance running safely and efficiently. Regular maintenance not only prevents fires but also extends the life of your dryer and reduces energy costs. You can calculate energy consumption to see how much an inefficient dryer costs you monthly.
Stop using your dryer immediately if you notice any of these conditions: burning smells, visible smoke, scorch marks on clothing, or the exterior becoming too hot to touch. These are emergency situations. Unplug the appliance and do not use it until the problem is identified and resolved. The thermal fuse is designed to blow and cut power when overheating occurs. If your dryer has shut off and will not restart, the fuse has likely sacrificed itself to prevent a fire.
Know when to call a professional. Gas dryer repairs, complex electrical issues, and internal component replacement are jobs for qualified technicians. If you are not comfortable using a multimeter, working with 240-volt electricity, or disassembling appliance panels, seek professional help. The cost of a service call is far less than the cost of fire damage or medical bills from injury.
Establish a maintenance schedule to prevent future overheating. Clean the lint filter before every load. Inspect the filter housing monthly. Check the exterior vent hood quarterly to ensure it opens and closes freely. Deep clean the entire vent system annually, either yourself or by hiring a duct cleaning service. Professional dryer vent cleaning costs between 100 and 200 dollars but prevents thousands of dollars in fire damage.
Watch for warning signs between maintenance cycles. Clothes taking longer to dry, the dryer feeling hotter than usual, or unusual noises from the blower area all indicate developing problems. Address these symptoms promptly before they escalate to dangerous overheating.
While most dryers share common components, certain brands have known issues that cause overheating. If you own one of these popular brands, consider these specific troubleshooting notes alongside the general guidance above.
Samsung dryers often develop blower wheel issues due to the wheel slipping on the motor shaft. If you have a Samsung dryer too hot situation, check the blower wheel connection first. The heating element in Samsung models is also positioned where lint accumulation is common, requiring more frequent cleaning.
Whirlpool dryers, including Kenmore models made by Whirlpool, have excellent vent systems but are prone to cycling thermostat failure after five to seven years of use. If your Whirlpool dryer overheats specifically on the low heat setting, suspect the thermostat before the heating element.
LG dryers feature sensor drying systems that can misread and overheat if the moisture sensors become coated with fabric softener residue. Clean the sensor bars inside the drum with rubbing alcohol if you notice temperature irregularities. LG blower wheels are also more susceptible to cracking than other brands.
The most common reasons are restricted airflow from lint buildup, a blocked vent hose, or a clogged exhaust vent. Other causes include a faulty heating element that stays on continuously, a malfunctioning cycling thermostat that fails to turn off the heat, or a damaged blower wheel that cannot move air properly. In gas dryers, a stuck gas valve can cause continuous burning.
Clean the lint filter thoroughly and check the vent hose for blockages. Ensure the exterior vent hood opens freely. If these steps do not help, test the cycling thermostat and heating element with a multimeter. Replace faulty components. Never bypass safety thermostats as this creates fire hazards. For gas dryers, call a professional if basic cleaning does not resolve the issue.
A dryer may continue working temporarily while overheating, but this is extremely dangerous. Most modern dryers have thermal fuses that will blow and shut down the appliance to prevent fires. If your thermal fuse has blown, the dryer will not start again until the underlying cause is fixed and the fuse is replaced. Continuing to use an overheating dryer risks fire, damaged clothing, and permanent appliance damage.
After shutting off, a dryer typically needs 30 minutes to one hour to cool to a safe temperature for handling. If the thermal fuse has blown, the appliance will not restart until the fuse is replaced. During this cooling period, inspect the lint filter, vent hose, and exterior vent for obvious blockages. If you smelled burning or saw smoke, wait several hours and consider having the dryer professionally inspected before using it again.
A dryer too hot situation is never something to ignore. Whether the cause is a simple lint blockage or a complex heating element failure, the fire risk is real and immediate. The diagnostic steps outlined in this guide will help you identify the root cause safely and efficiently. Start with the basics: clean the lint filter, check the vent hose, and inspect the exterior vent hood. These simple actions solve the majority of overheating problems without requiring tools or replacement parts.
If basic cleaning does not resolve the issue, move systematically through the component testing procedures. Use a multimeter to check the heating element and cycling thermostat. Inspect the blower wheel and felt seals for damage. Remember that gas dryers require extra caution and often professional service. Your safety matters more than saving a service call fee.
Regular maintenance prevents overheating before it starts. Clean your lint filter daily, inspect the vent system monthly, and schedule annual deep cleanings. Watch for warning signs like longer dry times or hotter exterior surfaces. Address problems promptly to keep your appliance running safely for years to come. For more appliance troubleshooting guides, explore our other appliance guides and keep your home running smoothly.