Physical Address
304 North Cardinal St.
Dorchester Center, MA 02124
Physical Address
304 North Cardinal St.
Dorchester Center, MA 02124

Learning how to bleed a gas fireplace is an essential skill for any homeowner with gas heating. When air gets trapped in your gas lines, the pilot light won’t ignite properly and your fireplace becomes useless during those cold winter months. This process, also called purging the gas line, removes trapped air that prevents the gas flow from reaching your pilot assembly.
Air enters gas lines during new installations, after repairs, when propane tanks run empty, or after long periods of disuse. Without bleeding the lines first, you’ll hear the igniter clicking repeatedly but never see that steady blue flame. In this guide, our team walks you through the complete process with clear safety warnings based on HVAC technician recommendations and real homeowner experiences from forums across the web.
Bleeding a gas fireplace means removing trapped air from the gas supply lines before attempting to light the pilot. Gas lines can contain air pockets that prevent fuel from reaching the pilot assembly properly, causing ignition failures or weak flames. This process forces the air out by allowing gas to flow through the pilot tube until a steady stream of fuel emerges.
Air enters your gas lines through several common scenarios. New gas line installations almost always contain air that must be purged before first use. When your propane tank runs completely empty and you get a refill, air enters the line during the changeover. Extended periods of non-use, such as over summer months, can allow small amounts of air to seep in. After any gas shut-off for repairs or maintenance, air will be present when service resumes.
The bleeding process differs slightly depending on your fuel type. Natural gas fireplaces connect to municipal supply lines that maintain constant pressure, making bleeding generally quicker since the pressure helps push air through. Propane fireplaces rely on tank pressure which diminishes as fuel levels drop, potentially requiring longer bleeding times especially after tank refills.
Propane systems also need more attention to the regulator, which can trap air separately from the main line. Natural gas systems typically have simpler valve configurations but may require you to contact your utility company if pressure issues persist beyond simple bleeding. Both systems use the same fundamental procedure, but propane users should expect to hold the pilot button longer to achieve proper purging.
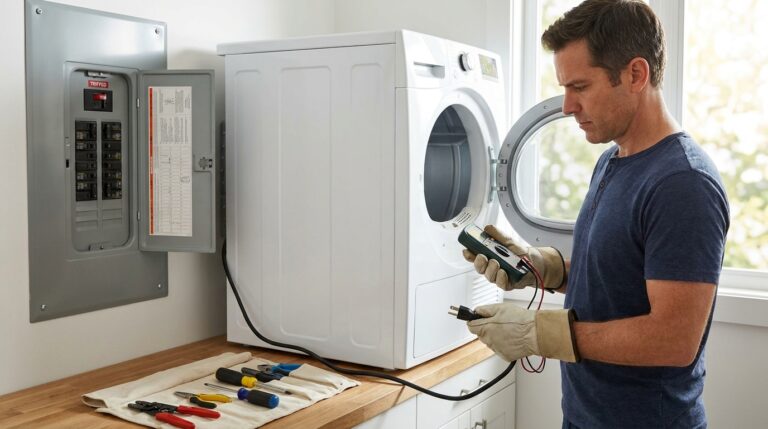
Gather these basic tools before starting the bleeding process. Having everything ready prevents interruptions that could allow more air into the system or create safety hazards from gas buildup.
Forum users consistently emphasize the carbon monoxide detector as non-negotiable safety equipment. Multiple homeowners on DIY forums reported discovering dangerous CO levels only because they had working detectors in place before attempting gas work.
Follow these numbered steps carefully to purge air from your gas lines safely. Work in a well-ventilated area and keep your carbon monoxide detector active throughout the process.
Locate your main gas shut-off valve and turn it to the OFF position. For natural gas, this valve sits near your gas meter or where the line enters your home. Propane systems have a shut-off at the tank itself. Wait five minutes after shutting off the gas before proceeding to allow any accumulated gas to dissipate safely.
Find the control knob inside your fireplace, usually positioned near the bottom behind a removable panel or decorative grate. This knob typically has three positions: OFF, PILOT, and ON. Some models label these positions with icons rather than words. Note whether your unit uses a standing pilot system or electronic ignition, as this affects how you’ll proceed.
Turn the control knob to the PILOT position while pressing it inward. This opens the gas flow specifically to the pilot tube while blocking the main burner supply. Keep the knob pressed in throughout this entire bleeding process – releasing it too early allows air back into the line and you’ll need to start over.
Press the igniter button repeatedly every 2-3 seconds while holding the control knob down. You may hear clicking sounds without seeing a flame initially – this indicates trapped air is escaping. Continue pressing the igniter for up to 60 seconds or until the pilot light establishes a steady blue flame. Units with electronic spark ignition will click audibly; manual igniter systems require you to use your long lighter at the pilot assembly location.
Based on forum feedback from experienced users, expect to press the igniter 15-30 times before the pilot lights when significant air is present in the lines. One forum user noted: “Continue to hold the pilot button and bleed the air through the little pilot tube. Three full minutes should purge your line.” While three minutes represents the extreme end, most systems purge within 30-90 seconds of continuous operation.
Once the pilot flame appears, continue holding the control knob down for at least 30 seconds. This waiting period allows the thermocouple to heat up sufficiently. The thermocouple is a safety device that senses heat from the pilot flame and keeps the gas valve open. Without adequate heating time, the thermocouple will shut off gas flow immediately when you release the knob.
If your pilot still won’t stay lit after 60 seconds, the thermocouple may need replacement rather than additional bleeding. Newer fireplaces with electronic flame sensors follow similar timing requirements for the sensor to establish proper readings.
Slowly release the control knob while watching the pilot flame closely. The flame should remain steady and blue without flickering or going out. A properly functioning pilot shows a consistent blue color with perhaps a small yellow tip. If the flame extinguishes immediately upon release, either air remains in the line or your thermocouple requires service.
Rotate the control knob to the ON position once you’ve confirmed a stable pilot flame. Attempt to start the main burner using your fireplace’s normal ignition switch or remote control. The burner should ignite within 3-5 seconds with a smooth blue flame pattern. If the burner fails to light or shows yellow/orange coloring, additional bleeding may be necessary or you may have a separate burner issue requiring professional attention.
Gas work requires absolute respect for safety protocols. Natural gas and propane can cause explosions, fires, and carbon monoxide poisoning when handled improperly. These warnings come from utility company guidelines and forum discussions where homeowners shared close-call experiences.
Utility companies add a chemical called mercaptan to natural gas and propane specifically to create a rotten egg or sulfur smell. This odor makes otherwise odorless gas detectable by humans. If you smell this distinctive odor at any point during the bleeding process, stop immediately. Do not attempt to light any flames. Turn off all gas supplies and ventilate the area by opening windows and doors.
Carbon monoxide presents a different danger – it has no smell, color, or taste. The only reliable detection method is an electronic carbon monoxide detector placed within 10 feet of your gas fireplace. Headaches, dizziness, or nausea while operating gas appliances can indicate carbon monoxide exposure even without detector activation.
Evacuate all people and pets from the home immediately if you detect a strong gas odor. Do not use electrical switches, cell phones, or any devices that could create sparks near the gas smell. From a safe location outside, call your gas utility company’s emergency line or 911. Do not re-enter until professionals declare the area safe.
Skip the DIY approach and call a licensed professional if you encounter any of these situations. You smell gas but cannot locate the source. The gas line shows visible damage, corrosion, or loose fittings. Your home lacks functioning carbon monoxide detectors. You feel uncertain about any step in the process. Multiple attempts at bleeding have failed to establish a stable pilot. The fireplace has not been serviced in over two years.
Forum consensus strongly favors professional intervention for gas work. One Reddit user in the Plumbing community summarized: “Gas line purging question for gas fireplace – the fireplace pilot comes on but the burner doesn’t ignite. Fireplace store is telling me that it may be because the gas line needs to be purged of air.” Even when the issue seems simple, many homeowners prefer paying for peace of mind.
Even with proper bleeding technique, issues can arise. This section addresses the most common problems reported by homeowners in forum discussions and our team’s research.
A pilot that ignites but extinguishes when you release the control knob indicates a thermocouple problem rather than air in the lines. The thermocouple may be dirty, misaligned, or worn out. Clean the thermocouple tip with fine sandpaper to remove carbon buildup, ensuring it sits directly in the pilot flame path. If cleaning doesn’t help, replacement typically costs under $30 for the part and solves the issue immediately.
This symptom frustrates many homeowners who have successfully bled their lines. The pilot burns steadily blue, yet the main burner refuses to light when switched on. Several causes exist beyond simple air pockets. The gas valve itself may have failed internally, preventing flow to the burner despite proper pilot operation. Debris in the burner orifices can block gas flow – compressed air blown through the valve sometimes clears this according to GarageJournal forum users.
One forum user reported success by taking compressed air and blowing out the valve on the insert. However, this approach requires some technical comfort with fireplace components. If the burner still won’t ignite after two bleeding attempts, professional service becomes the safest choice.
Electronic ignition systems that click repeatedly without producing a spark or flame usually indicate either a dead battery in the ignition system or a misaligned spark electrode. Replace the battery first – most units use AA or 9V batteries accessible behind the control panel. Check that the spark electrode sits approximately 1/8 inch from the pilot gas tube, creating a visible spark arc when activated.
The complete bleeding process typically requires 5-10 minutes of active work. Holding the pilot button and pressing the igniter should produce a flame within 60-90 seconds for properly purged lines. If you’ve held the button for three full minutes without ignition, either significant air remains in the system or a mechanical issue prevents proper operation. Persistent failures after 5 minutes of cumulative ignition attempts suggest professional evaluation is needed.
Licensed gas technicians have the training, tools, and certification to handle complex gas fireplace issues safely. While bleeding lines falls within many homeowners’ DIY capabilities, certain situations demand professional expertise.
Contact a professional if you smell gas at any point during the bleeding process. Persistent ignition failures after three bleeding attempts indicate deeper mechanical problems. Visible damage to gas lines, valves, or connectors requires professional replacement, not homeowner patching. If your fireplace hasn’t been professionally serviced in over two years, schedule maintenance rather than attempting DIY repairs.
Professional service typically costs $100-200 for basic maintenance and bleeding, which includes inspection of all safety systems. This investment protects your home and family from the serious risks of improper gas work. The Home-Wizard forum emphasizes this point consistently: “When not managed properly, natural gas can be VERY dangerous. We would suggest that your gas lines only be bled by a licensed profession who has the experience and skills to do this.”
Preventative maintenance reduces how often you need to bleed your gas fireplace and keeps the system running safely year after year. Follow this simple annual schedule to avoid mid-winter emergencies.
Schedule professional inspection every 12 months before the heating season begins. Technicians clean burner orifices, check thermocouple function, inspect gas line connections, and verify carbon monoxide detector placement. Test your carbon monoxide detector monthly by pressing the test button and replace batteries every six months regardless of test results.
Keep the pilot area clean by gently vacuuming dust and debris from the fireplace interior during seasonal shutdown. Dust accumulation can block the tiny pilot orifice and mimic air-in-line symptoms. For propane users, never let your tank run completely empty – schedule refills when levels drop below 20% to minimize air entry into the lines.
Turn the gas valve to the PILOT position and hold it down. Press the igniter repeatedly every 2-3 seconds for up to 60 seconds until the pilot lights. Continue holding the valve for 30 seconds after ignition, then release slowly. If the pilot stays lit, turn the valve to ON and test the main burner.
Hold the pilot button down for 30-60 seconds after the flame ignites. This heating time allows the thermocouple to reach operating temperature and keep the gas valve open. Release the button slowly and watch that the pilot flame remains steady.
Yes, most homeowners can safely bleed gas fireplace lines by following proper procedures. However, if you smell gas at any point, lack carbon monoxide detectors, or feel uncertain about the process, call a licensed professional. Safety should always take priority over DIY savings.
This typically indicates either insufficient gas pressure, a failed gas valve, or debris in the burner orifices. Try bleeding the lines again to ensure all air is purged. If the problem persists after two attempts, contact a professional technician to inspect the gas valve and burner components.
Yes, gas fireplaces can cause headaches if they’re producing carbon monoxide due to incomplete combustion or ventilation problems. Headaches, dizziness, or nausea while the fireplace operates indicate potential CO exposure. Turn off the fireplace immediately, ventilate the area, and have the unit professionally inspected before using it again.
If a gas burner was left on without ignition, ventilate the area for at least 30 minutes before attempting to relight. Open all windows and doors to create cross-ventilation. Do not use electrical switches or create sparks during this period. If you smell strong gas odor, evacuate and call your gas utility emergency line.
The most common gas fireplace problem is a pilot light that won’t stay lit, usually caused by a dirty or failing thermocouple, air in the gas line, or spider webs blocking the pilot orifice. Annual maintenance prevents most of these issues by keeping components clean and properly adjusted.
Knowing how to bleed a gas fireplace saves you from cold nights and expensive service calls for simple air-in-line issues. The process requires patience, attention to safety protocols, and respect for the serious risks that natural gas and propane present when mishandled.
Always prioritize safety over speed when working with gas systems. If any step feels uncomfortable or you smell gas at any point, stop immediately and contact a licensed professional. Your fireplace should provide warmth and comfort, not stress and danger. With proper bleeding technique and regular annual maintenance, your gas fireplace will serve your family reliably for years to come.