Physical Address
304 North Cardinal St.
Dorchester Center, MA 02124
Physical Address
304 North Cardinal St.
Dorchester Center, MA 02124

A dehumidifier leaking water onto your floor is one of the most frustrating problems homeowners face. I have dealt with this issue multiple times over the years, and I can tell you that a leaking dehumidifier is not normal. When your unit starts dripping from the bottom or back, it signals that something needs immediate attention to prevent water damage and restore proper humidity control and dehumidifier usage.
The good news is that most dehumidifier leaking issues have simple fixes you can handle yourself. Our team has researched the most common causes by analyzing repair forums and manufacturer guidance from brands like Frigidaire and EcoAir. In this guide, you will learn exactly why your dehumidifier is leaking and how to fix it step by step.
Dehumidifiers leak for five primary reasons that we see repeatedly in repair scenarios. The water collection bucket may be full or misaligned, causing overflow onto your floor. A clogged or improperly connected drain hose can back up and leak. Dirty air filters restrict airflow and cause ice to form on the evaporator coils, which melts and leaks. The unit might be sitting on an uneven surface that tilts the water tank. Finally, the water tank itself may have a crack or damage you cannot see from the outside.
Understanding normal daily water collection expectations helps you identify when leaking is abnormal. A properly functioning unit collects water in the tank or drains it through the hose without any external moisture. If you see water pooling under or around the unit, you have a leak that needs investigation.
The most common cause of dehumidifier leaking is also the easiest to fix. When the water bucket reaches capacity, it should trigger the float switch to shut off the unit automatically. However, if the bucket is not seated correctly or the float switch malfunctions, water continues to collect and spills over the edges.
I once spent 20 minutes troubleshooting a leaky unit only to discover the bucket was sitting half an inch off its proper track. The water was dripping from a tiny gap between the tank and the housing. Always remove the bucket completely and reinsert it firmly until you hear it click into place.
The float switch is a small buoyant mechanism that rises with the water level and signals the unit to stop dehumidifying. If this sensor gets stuck due to mineral buildup or debris, the unit keeps running and the tank overflows. Check the float mechanism monthly and clean it with a soft cloth to ensure free movement.
Some users report that their dehumidifier leaks before the tank appears full. This happens when the float switch fails to rise properly or when water seeps into crevices between the tank and internal components. The tank may look half empty while water pools in hidden channels and eventually drips from the bottom.
Continuous drainage setups are convenient but introduce new failure points for leaks. The drain hose can become clogged with algae, mold, or mineral deposits over time, causing water to back up and overflow from the connection point. A kinked hose or one that dips below the drainage outlet level creates a siphoning problem that leaks water back onto your floor.
If you run your dehumidifier hose to a basement sump pump or floor drain, check the entire length regularly. I recommend inspecting the hose monthly by disconnecting it and running water through to verify free flow. Any blockage, no matter how small, can cause backup leaks that appear to come from the dehumidifier itself.
The hose connection to the dehumidifier body is another common leak point. These plastic threads can crack or the rubber gasket can degrade over time. Hand-tighten only and avoid using tools that can overtighten and damage the fitting. If you notice water dripping from the back of your unit near the hose port, the connection needs resealing or replacement.
Forum users with very humid basements frequently mention pumping water into sump systems as a challenge. One homeowner reported their setup worked fine until the hose developed a pinhole crack that sprayed water behind the unit. Check the entire hose length for damage, especially where it bends or contacts sharp edges.
A dirty air filter is the hidden cause of many dehumidifier leaks that homeowners overlook. When the filter becomes clogged with dust and debris, airflow across the evaporator coils drops significantly. The coils get too cold and frost builds up, eventually forming a solid block of ice inside the unit.
Once the defrost cycle activates or the unit shuts off, this ice melts rapidly. The water can overwhelm the collection system and leak from seams, vents, or the bottom of the unit. If you notice your dehumidifier leaking intermittently and hear hissing or dripping sounds from inside, ice buildup is likely the culprit.
Clean your air filter every two weeks during heavy use seasons. Most filters slide out easily and can be vacuumed or rinsed with warm water. Allow the filter to dry completely before reinstalling to prevent mold growth. This simple maintenance step prevents ice formation and extends your unit’s lifespan.
Some dehumidifiers also have internal water filters that need monthly cleaning. Users on repair forums report that cleaning only the air filter while ignoring the water filter still leads to performance issues and leaks. Check your manual for water filter location and cleaning instructions specific to your model.
Dehumidifiers must sit on a flat, level surface to function properly without leaking. Even a slight tilt can cause the water bucket to sit crooked or the internal drainage channels to direct water to the wrong outlet. I have seen units leak simply because one leg was resting on an uneven basement floor tile.
Before placing your dehumidifier, check the surface with a level or place a small amount of water on the floor to see if it pools in one direction. Adjustable feet on most units can compensate for minor unevenness. Take the time to adjust these so the unit sits firmly without rocking.
Moving your dehumidifier while it contains water is a common mistake that causes immediate leaks. The water sloshes inside the tank and splashes into areas not designed to hold it, then drips from the housing for hours afterward. Always empty the tank completely and wait 30 minutes after shutdown before relocating your unit.
For basement installations, consider best dehumidifiers for basement environments that include better leveling features and overflow protection. These models are designed for the challenging conditions found in below-grade spaces.
Plastic water tanks can develop hairline cracks that are nearly invisible but allow steady water leakage. These cracks often form at stress points like corners, handle attachments, or where the tank connects to the float mechanism. The leak may seem mysterious because the tank holds water when removed but drips when installed in the unit.
To test your tank for hidden damage, fill it with water and place it on newspaper for several hours. Any pinhole cracks will show as damp spots on the paper. Also inspect the tank while it is empty by holding it up to a bright light and looking for hairline fractures in the plastic.
Small cracks in non-structural areas can sometimes be repaired with aquarium-safe silicone sealant. Clean and dry the area thoroughly, apply a thin layer of sealant, and allow 24 hours to cure before using. However, cracks near handles or the float mechanism usually require tank replacement for safety.
Replacement tanks are available from manufacturers but can cost 30 to 50 percent of a new unit’s price. If your dehumidifier is more than five years old, compare the tank replacement cost against upgrading to a new model with better features and warranty coverage.
The water stopper, also called a debung or drain plug, seals the hole where water exits the tank during emptying. If this stopper is missing, damaged, or not fully seated, water leaks continuously from the tank even when the unit is running normally. Check that the stopper is present and properly inserted before each use.
Float switch failures are more serious and often require component replacement. The float can become waterlogged, cracked, or detached from its pivot point. When this happens, the unit does not sense the water level and continues operating until water overflows. You may notice the compressor running constantly even when the tank is full.
Testing the float switch is simple. Fill the tank with water and observe whether the float rises freely to the surface. Press down gently on the float while the unit is running; it should turn off immediately. If it does not, the switch mechanism needs cleaning or replacement.
Some models have electronic sensors instead of mechanical floats. These can fail due to mineral buildup or corrosion on the sensor contacts. Clean the sensor area with vinegar solution and a soft brush to restore proper function. Persistent sensor errors usually indicate the need for professional repair.
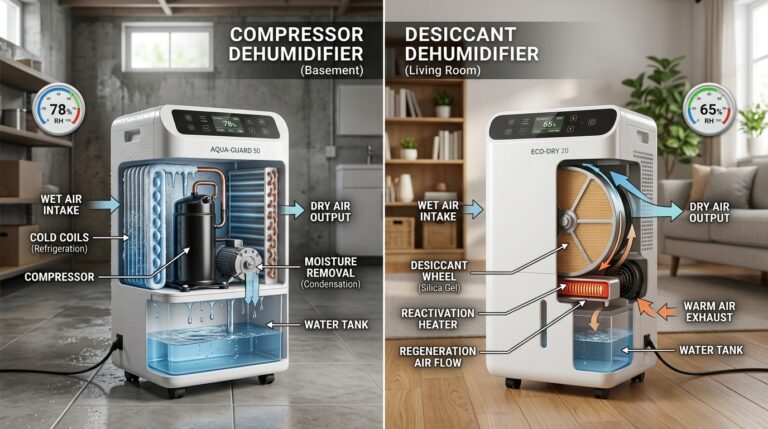
Compressor-based dehumidifiers have specific operating temperature ranges that directly affect leaking issues. Most units work best between 15 degrees Celsius and 35 degrees Celsius (59 to 95 degrees Fahrenheit). When temperatures drop below this range, the evaporator coils frost over and cause the ice-melt leaking problem described earlier.
Basements and crawl spaces often run colder than the main living areas of your home. If your dehumidifier is leaking during winter months or in a particularly cold corner, temperature is likely the cause. Check the room temperature with a thermometer placed near the unit during operation.
Desiccant dehumidifiers work better in cold environments because they do not use compressor coils that frost over. If you need dehumidification in a space that regularly drops below 15 degrees Celsius, consider switching technologies. The upfront cost difference pays for itself in reduced maintenance and better performance.
The defrost cycle in compressor units is designed to handle brief temperature dips. However, if your unit runs continuously in cold conditions, the defrost cycle cannot keep up and ice builds up until melting causes leaks. This is a sign that your unit is not suited for the ambient conditions.
Not all dehumidifier leaks involve the water collection system. Refrigerant leaks create ice on the evaporator coils that melts and appears as water leaking from the unit. Signs of refrigerant loss include ice buildup even with clean filters, reduced water collection despite running constantly, and warm air blowing from the exhaust.
Motor failure is another internal issue that can cause leaks indirectly. When the compressor motor weakens, it cannot maintain proper coil temperatures. The system runs longer cycles, frost builds up excessively, and the resulting meltwater overwhelms the drainage system. Motors typically last 4 to 9 years depending on use and maintenance.
Listen for unusual sounds that indicate motor problems. A struggling compressor makes louder humming, clicking, or rattling noises compared to normal operation. If your unit is leaking and the motor sounds different than when new, the two issues may be connected.
Repairing refrigerant systems or replacing motors costs 40 to 60 dollars for parts plus labor if you hire a technician. For units out of warranty, replacement often makes more financial sense than repair. If you face this decision, explore top-performing quiet dehumidifier options for current models with better efficiency.
Follow this systematic approach to diagnose and fix your dehumidifier leaking problem. Work through each step in order, testing the unit after each fix before proceeding to the next.
Step 1: Unplug the Unit
Safety comes first. Always disconnect power before inspecting internal components or handling water collection parts.
Step 2: Check the Water Bucket
Remove the tank completely and empty it. Inspect for cracks by holding it to light. Reinsert firmly until you hear the click that indicates proper seating.
Step 3: Verify the Water Stopper
Confirm the drain plug or debung is present and fully seated in the tank outlet hole. Replace if damaged or missing.
Step 4: Test the Float Switch
Fill the tank partially and watch the float rise. Press it down gently; the unit should turn off if the switch works properly.
Step 5: Clean the Air Filter
Remove the filter and vacuum or rinse it thoroughly. Allow complete drying before reinstalling.
Step 6: Inspect the Drain Hose
Check for kinks, cracks, or blockages. Run water through the hose to verify free flow. Clean connections and replace damaged sections.
Step 7: Level the Unit
Place a level on top of the dehumidifier and adjust the feet until the bubble centers. The unit should sit firmly without rocking.
Step 8: Check Ambient Temperature
Verify room temperature is between 15 and 35 degrees Celsius. Move the unit to a warmer location if needed.
Step 9: Look for Internal Ice
If you suspect ice buildup, turn off the unit and leave it unplugged for 4 hours with the air filter removed to allow complete defrosting.
Step 10: Test Operation
Plug in and run the unit for 2 hours while monitoring for leaks. If leaking continues, professional service is likely needed.
Some dehumidifier leaking issues require professional diagnosis and repair. If you have worked through the troubleshooting steps and the unit still leaks, internal component failure is likely. Refrigerant system problems, compressor motor failures, and electronic control board issues need specialized tools and expertise.
HVAC technicians or appliance repair services can perform pressure testing on refrigerant systems and motor diagnostics. Expect to pay 75 to 150 dollars for the service call plus parts. Get a written estimate before authorizing repairs that exceed 50 percent of replacement cost.
Consider the age of your unit when deciding between repair and replacement. Dehumidifiers have a typical lifespan of 4 to 9 years depending on usage and maintenance. If yours is nearing the end of this range, investing in a new energy-efficient model may save money long term through lower operating costs and better performance.
Preventing dehumidifier leaks is easier than fixing them after water damage occurs. Establish a regular maintenance routine based on how heavily you use the unit. Homes with high humidity need more frequent attention than those running dehumidifiers occasionally.
Clean the air filter every two weeks during peak season. Empty and inspect the water tank weekly for cracks or damage. Check the drain hose monthly for blockages, especially if running continuous drainage. Test the float switch quarterly by filling the tank and verifying shutoff.
Deep clean your dehumidifier at the end of each heavy use season. Wipe down all internal surfaces with a mild bleach solution to prevent mold and algae growth. Clean the evaporator coils with a soft brush and coil cleaner if accessible. Store the unit with the tank removed and all water pathways dried completely.
Proper moving technique prevents damage that leads to leaks. Always empty the tank and wait 30 minutes after shutdown before transport. Keep the unit upright during movement; laying it on its side can cause compressor oil to migrate and damage the system. Let the unit sit upright for 2 hours before restarting after any tilt.
No, it is not normal for a dehumidifier to leak. A properly functioning unit collects all water in the tank or drains it through the hose without any external moisture. Leaking indicates a problem with the water bucket, drain hose, air filter, placement, or internal components that needs immediate attention.
A dehumidifier leaking from the bottom usually indicates a full or misaligned water bucket, a missing water stopper, a cracked tank, or water overflow from a failed float switch. Check that the bucket is properly seated, the drain plug is in place, and the float mechanism moves freely.
No, dehumidifiers are not designed to leak from the bottom. The unit should collect water internally and either store it in the tank or drain it through the hose. Any water leaking from the bottom signals an issue that requires troubleshooting and repair.
A whole house dehumidifier typically lasts 4 to 9 years depending on usage, maintenance, and environmental conditions. Regular filter cleaning, proper placement, and addressing minor issues promptly can extend lifespan toward the upper end of this range.
A dehumidifier leaking water is a fixable problem that most homeowners can resolve with systematic troubleshooting. The most common causes are misaligned buckets, clogged hoses, dirty filters, uneven placement, and damaged tanks. Work through the 10-step checklist in this guide to identify and fix your specific issue.
If basic troubleshooting does not stop the leaking, consult a professional for internal component diagnosis. Consider replacement if your unit is over 5 years old and requires expensive repairs. With proper maintenance and care, your next dehumidifier should provide years of leak-free humidity control for your home.