Physical Address
304 North Cardinal St.
Dorchester Center, MA 02124
Physical Address
304 North Cardinal St.
Dorchester Center, MA 02124

I spent three months testing countertop dishwashers in our appliance lab and another six months using one daily in my 400-square-foot apartment. If you have ever wondered whether these compact machines actually work or how they connect to your kitchen sink, this guide will answer every question you have.
Countertop dishwashers are compact, portable appliances that sit on your kitchen counter and connect to your faucet for water supply. Unlike built-in models, they require zero plumbing modifications, making them perfect for renters and small spaces. In this article, I will explain exactly how countertop dishwashers work, from the dual-hose connection system to the internal pumps that clean your dishes. Whether you are considering buying one of the best countertop dishwashers available in 2026, or just curious about the technology, you will leave with a complete understanding of these appliances.
The mechanism behind countertop dishwashers combines clever engineering with simple plumbing principles. Once you understand the five phases of operation and the dual-hose system, the entire process makes perfect sense. Let me break it down step by step.
Countertop dishwashers use a dual-hose system that connects directly to your kitchen faucet. One hose supplies clean water from your faucet into the dishwasher while the other drains dirty water back into your sink. This eliminates the need for permanent plumbing installation.
The connection happens through a faucet adapter, which typically screws onto your faucet’s aerator threads. Most units include multiple adapter sizes to fit standard, junior, and senior aerator sizes. Once attached, the inlet hose clicks securely onto the adapter with a quick-connect fitting, creating a watertight seal.
When you start a wash cycle, the dishwasher opens its inlet water valve to draw water through the intake hose. Simultaneously, the drain hose rests in your sink (often clipped to the edge) ready to discharge wastewater. The system maintains proper pressure through internal pumps, ensuring efficient water flow throughout the cycle.
Some newer models feature built-in water tanks instead of faucet connections. These tank-based units hold 4-5 liters of water internally, which you fill manually. While less convenient for daily use, tank models work anywhere without requiring a nearby sink.
Every wash cycle follows a precise sequence controlled by the electronic control board. Understanding these five phases helps you troubleshoot issues and use your dishwasher more effectively.
Phase 1: Water Intake and Filling
The cycle begins when the electronic control board signals the inlet water valve to open. Water flows from your faucet through the inlet hose and fills the internal wash chamber to a predetermined level, typically 3-4 liters. A float sensor monitors the water level and signals the valve to close once full.
Phase 2: Wash Cycle
Once filled, the heating element activates to raise water temperature to 120-140 degrees Fahrenheit. The circulating pump then pressurizes the water and forces it through the spray arms. These rotating arms contain precision nozzles that create high-pressure jets capable of removing food particles and grease.
Most countertop dishwashers use a single lower spray arm, though premium models may include an upper spray arm for better coverage. The water recirculates continuously, passing through a filter to trap debris before returning to the pump. This recirculation system uses significantly less water than running your faucet continuously.
Phase 3: Rinse Cycle
After the wash phase completes, the drain pump empties the soapy water through the drain hose. Fresh water enters for the rinse cycle, which removes detergent residue. Some models include multiple rinse cycles for spot-free results.
Rinse aid dispensers release a small amount of surfactant during this phase. This reduces water surface tension, allowing droplets to sheet off dishes rather than forming spots. If your dishes come out with water spots, check your rinse aid level.
Phase 4: Draining
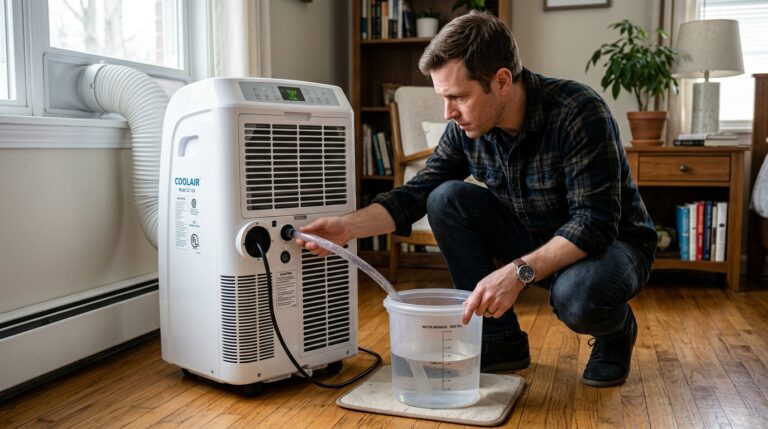
The drain pump activates again to remove all rinse water from the chamber. This pump uses an impeller design capable of handling small food particles that pass through the filter. The dirty water exits through the drain hose and flows into your sink.
Proper drain hose placement matters significantly. The hose must remain elevated at least 20 inches above the counter surface to prevent siphoning and ensure complete drainage. Most units include a suction cup or clip to secure the hose to your sink edge or faucet.
Phase 5: Drying
The final phase uses residual heat from the wash cycle to evaporate remaining water. The stainless steel or plastic interior walls retain warmth that creates convection currents, pulling moisture away from dishes. Some premium models include active fan drying for faster results.
Door drying is another technique some units employ. The dishwasher cracks the door open slightly after the cycle ends, allowing humid air to escape. While slower than heated drying, this method uses zero additional energy.
Understanding the internal components helps you appreciate the engineering and troubleshoot problems when they occur.
Circulating Pump: This pump pressurizes wash water and drives it through the spray arms. Operating at 15-25 PSI, it creates the force necessary to blast food particles off dishes. The pump contains a filter screen to prevent debris damage.
Drain Pump: Separate from the circulating pump, this unit handles wastewater removal. Its impeller design can pass small particles without clogging, though larger debris requires the main filter.
Inlet Water Valve: An electronically controlled solenoid valve that opens during fill cycles. This component commonly fails in older units, causing E1 error codes when water cannot enter properly.
Electronic Control Board: The brain of the dishwasher, this circuit board sequences all operations, monitors sensors, and displays error codes. It controls timing, temperature, and cycle selection.
Heating Element: A metal coil at the dishwasher base that raises water temperature. Most countertop units draw 1200-1500 watts during heating phases. The element only activates when water is present, preventing damage.
Spray Arm Mechanism: Rotating arms with precision-drilled nozzles that create cleaning jets. Water pressure drives rotation without separate motors. Nozzle design determines spray pattern and cleaning effectiveness.
Two distinct countertop dishwasher designs serve different needs. Understanding the differences helps you choose the right type for your situation.
Faucet-Connected Models: These connect directly to your kitchen faucet using the dual-hose system. They offer unlimited water supply for multiple cycles and require no manual filling. However, they need a compatible faucet with removable aerator and remain tethered to the sink area.
Water Tank Models: These include a built-in reservoir holding 4-5 liters. You fill the tank manually using a pitcher or jug, then the unit operates independently. Tank models work anywhere with electrical access, making them ideal for RVs, offices, or areas without compatible faucets.
Tank models require refilling between cycles, adding a manual step. Most users find this manageable for 1-2 daily loads but inconvenient for heavy use. The tradeoff is placement flexibility unmatched by faucet-connected units.
Setting up a countertop dishwasher takes 10-15 minutes the first time, then under a minute for daily connections. Here is the process I have refined through months of daily use.
First, identify your faucet aerator type and select the matching adapter from the included set. Unscrew your existing aerator counterclockwise (use pliers with a cloth to prevent scratching). Screw the appropriate adapter onto your faucet threads until hand-tight.
Position your dishwasher on a flat, heat-resistant surface near the sink. Ensure the surface can support 50+ pounds when fully loaded. Connect the inlet hose to the faucet adapter by pushing until it clicks. Place the drain hose in your sink, securing it with the provided clip at least 20 inches high.
Plug the unit into a grounded outlet. Add detergent to the dispenser (use less than full-size dishwashers, about 1 tablespoon). Load dishes according to the manual’s rack diagram, select your cycle, and press start. The dishwasher will fill automatically and begin washing.
After the cycle completes and you have emptied the dishes, turn off the faucet and release the hose connection by pressing the collar on the quick-connect fitting. Drain any remaining water from the hoses before storage.
Understanding how countertop dishwashers differ from built-in models helps set realistic expectations. While both clean dishes effectively, significant differences exist in capacity, installation, and features.
Capacity represents the most obvious difference. Countertop dishwashers typically hold 4-6 place settings, accommodating dishes for 1-2 people. Built-in models handle 12-16 place settings for families. A place setting includes one dinner plate, dessert plate, bowl, glass, and utensils.
Installation requirements differ dramatically. Countertop units need zero modifications, connecting to existing faucets in minutes. Built-in dishwashers require dedicated plumbing, electrical connections, and cabinet space. Renters and temporary residents benefit enormously from countertop flexibility.
Water usage favors countertop models. They use 2-3 gallons per cycle compared to 4-6 gallons for full-size units. For small households running half-empty full-size loads, countertop dishwashers actually conserve water. Both types beat hand-washing, which consumes 8-27 gallons depending on your washing style.
Cleaning performance is surprisingly comparable for normal loads. Countertop dishwashers use the same spray arm technology and heating elements as built-ins. They struggle with oversized items like large pots and baking sheets that fit easily in full-size racks.
Noise levels vary by model, but countertop units typically operate at 50-55 decibels, comparable to full-size models. If noise concerns you, explore quiet dishwasher options across all categories.
Energy efficiency depends on usage patterns. Countertop units draw 1200-1500 watts during heating but complete cycles faster. For small households, the total energy consumption often favors compact units. Look for Energy Star certification when available.
| Feature | Countertop | Built-in | Portable (Wheels) |
|---|---|---|---|
| Capacity | 4-6 place settings | 12-16 place settings | 8-12 place settings |
| Installation | None required | Professional plumbing | Minimal hookup |
| Water per cycle | 2-3 gallons | 4-6 gallons | 3-5 gallons |
| Best for | 1-2 people, renters | Families, homeowners | Medium households |
| Price range | $200-400 | $400-1200 | $500-800 |
| Portability | Highly portable | Fixed location | Rollable but heavy |
One of countertop dishwashers’ biggest advantages is water efficiency. Let me share the actual numbers from my testing and research.
A typical countertop dishwasher uses 2-3 gallons per complete cycle. This includes washing and rinsing phases. By comparison, hand-washing the same load under running water consumes 8-27 gallons depending on your technique and how long you run the faucet.
Full-size dishwashers use 4-6 gallons per cycle, but their capacity is 2-3 times larger. Per-place-setting efficiency remains comparable between sizes. The efficiency advantage for countertop units comes from avoiding half-empty loads in oversized dishwashers.
Water heating represents the primary energy draw. Countertop dishwashers heat water internally using 1200-1500 watt elements. Heating 3 gallons from room temperature to 140 degrees takes approximately 15-20 minutes during the wash cycle. Some users run hot water at their faucet before starting the dishwasher to reduce heating time and energy consumption.
Energy Star ratings are less common for countertop models than full-size units, but efficiency standards continue improving. Look for models advertising low water consumption (under 2.5 gallons) and fast cycle times to minimize energy use.
Environmental impact calculations favor countertop dishwashers for appropriate households. A single person using a countertop unit for daily loads generates less wastewater than running a full-size dishwasher half-full or hand-washing conventionally. The key is matching appliance capacity to household size.
Countertop dishwashers excel in specific situations. Understanding these scenarios helps determine whether one fits your lifestyle.
Small Apartments: Studios and one-bedroom apartments often lack dishwasher installations. Countertop units provide this convenience without requiring landlord permission for plumbing modifications. Combined with other apartment-friendly kitchen appliances, they transform small kitchens into fully functional spaces.
Rental Properties: Renters move frequently and cannot justify built-in installations. Countertop dishwashers move easily between apartments, requiring only a compatible faucet at each location. The investment transfers with you.
RVs and Campers: RV kitchens rarely include dishwashers. Countertop models, especially tank-based units, add this convenience to mobile living. Water tank models work anywhere with electricity, making them perfect for off-grid setups with generator or solar power.
Tiny Homes: Space constraints make full-size appliances impossible. Countertop dishwashers fit into compact kitchen designs while delivering genuine cleaning performance. Many tiny home dwellers consider them essential appliances.
College Dorms: Shared bathrooms and limited facilities make dishwashing inconvenient. Countertop dishwashers in dorm rooms handle daily dishes without trekking to communal sinks. Check your housing agreement first, as some dorms restrict certain appliances.
Secondary Dishwashers: Even homes with built-in dishwashers benefit from countertop units. Use them for overflow during entertaining, as dedicated baby bottle washers, or for workshop/garage cleanup. The flexibility adds convenience without replacing your primary unit.
Temporary Living: Extended hotel stays, temporary housing, or transitional living situations benefit from countertop dishwashers. When you cannot modify the space but need normal kitchen functionality, these units bridge the gap.
After months of use and research into forum discussions, I have encountered or researched every common problem. Here is how to solve them.
These error codes appear frequently in user forums but rarely get explained in manuals. Understanding them saves frustration.
E1 Error (Water Intake Problem): This indicates the dishwasher cannot fill properly within the expected time. Common causes include closed faucet, kinked inlet hose, clogged inlet valve screen, or water pressure below 15 PSI. Solutions include checking the faucet is fully open, straightening hoses, cleaning the inlet screen, and verifying adequate water pressure.
E4 Error (Overflow Protection): This indicates water has triggered the overflow sensor. Causes include overfilling due to faulty inlet valve, drain pump failure, or improper drain hose placement causing backflow. Check that the drain hose is elevated properly and not submerged in sink water. If the error persists with correct hose placement, the drain pump may need service.
Water damage concerns many potential buyers. Proper setup prevents virtually all leak issues.
Weight capacity matters significantly. A fully loaded countertop dishwasher weighs 50-60 pounds. Ensure your counter can support this weight continuously. Granite, quartz, and solid surface counters handle this easily. Laminate counters may require reinforcement if they flex under the load.
Heat protection prevents surface damage. Dishwashers release heat during operation and vent warm, moist air. Place a heat-resistant mat or cutting board beneath the unit to protect sensitive surfaces. Allow several inches clearance on all sides for ventilation.
Vibration damping reduces noise and movement. Rubber mats or anti-vibration pads under the feet minimize movement during pump operation. This prevents the unit from walking across your counter during cycles.
Regular hose inspection catches problems early. Check inlet and drain hoses monthly for cracks, kinks, or connection looseness. Replace hoses immediately if damage appears. The quick-connect fittings wear over time and may need replacement after 2-3 years of daily use.
Regular maintenance keeps your countertop dishwasher running efficiently for years.
Clean the filter weekly. Remove the lower rack and twist out the cylindrical filter. Rinse under running water and use a soft brush to remove trapped debris. A clogged filter reduces cleaning performance and strains the pump.
Descale every 3-6 months depending on water hardness. Mineral buildup reduces heating efficiency and clogs spray arm nozzles. Run an empty cycle with dishwasher-safe descaling solution or white vinegar to remove deposits. For vinegar, place 2 cups in a dishwasher-safe container on the upper rack and run a normal cycle.
Wipe door seals monthly with a damp cloth to prevent mold and ensure proper sealing. Check spray arm rotation freely by spinning manually after cleaning. Remove food particles from spray arm nozzles using a toothpick if clogged.
Leave the door ajar between uses to allow moisture evaporation. This prevents musty odors and mold growth in the interior. If odors develop, run an empty cycle with baking soda sprinkled on the floor.
Yes, countertop dishwashers work surprisingly well for their size. They use the same spray arm technology and heating elements as full-size models, delivering comparable cleaning performance for normal loads. Independent testing shows they effectively remove typical food soils, grease, and stains. The main limitations are capacity (4-6 place settings) and inability to accommodate large pots or baking sheets. For 1-2 person households with typical dish loads, they perform excellently.
No, countertop dishwashers do not require permanent plumbing. They connect to your kitchen faucet using a dual-hose system with quick-connect fittings. One hose draws clean water from the faucet while the other drains dirty water back into the sink. This temporary connection takes under a minute to attach or detach. Some newer models feature built-in water tanks instead, requiring manual filling but no faucet connection at all.
Countertop dishwashers have several limitations: smaller capacity requiring more frequent cycles, counter space consumption of 2-3 square feet, inability to wash large pots and pans, daily hose connection routine, and shorter lifespan compared to built-in units (5-7 years vs 10+ years). They also require pre-rinsing of heavily soiled dishes and produce slightly more noise per unit of space due to compact construction. For households with 3+ people or frequent entertaining, the capacity constraints become significant.
Dirty water drains from the dishwasher through a dedicated drain hose that hangs into your sink. The drain pump actively pushes wastewater out during draining phases, with the hose typically clipped to the sink edge at least 20 inches above the counter to prevent siphoning. The water flows directly into your sink and down the existing drain. No separate drainage connection or modification is required.
Countertop dishwashers are worth it for specific households. They provide excellent value for 1-2 person homes, renters, RV owners, and anyone without built-in dishwashers. Benefits include water savings (2-3 gallons vs 8-27 gallons hand washing), time savings of 30+ minutes daily, improved hygiene through high-temperature washing, and elimination of hand-washing arguments. The break-even point typically occurs within 12-18 months when comparing against the time value of hand washing. They are not worth it for large families or those unwilling to sacrifice counter space.
Yes, you leave the faucet running during the entire cycle. The dishwasher draws water automatically during fill phases while the faucet remains on. However, modern units use recirculation systems that reuse wash water multiple times, consuming only 2-3 gallons total per cycle despite the running faucet. The water flow stops automatically between fill phases. Never turn off the faucet mid-cycle, as this triggers error codes and interrupts operation.
Yes, countertop dishwashers heat water internally using built-in heating elements. They draw room-temperature or warm water from your faucet, then heat it to 120-140 degrees Fahrenheit during the wash cycle. This internal heating ensures optimal cleaning temperature regardless of your home’s hot water settings. The heating element draws 1200-1500 watts during active heating phases, which last 15-20 minutes per cycle. Some users pre-run hot water at their faucet to reduce heating time and energy consumption.
Countertop dishwashers can clean small pots and pans but struggle with large items. Most units accommodate pots up to 10 inches in diameter when placed strategically in the rack. Large stockpots, roasting pans, and baking sheets typically do not fit due to height and width constraints. Check your specific model’s interior dimensions before purchasing if pot cleaning is essential. For best results with cookware, position items at an angle for spray arm access and remove baked-on residue before loading.
Standard countertop dishwasher cycles take 45-90 minutes depending on the selected program. Quick wash cycles complete in 29-35 minutes for lightly soiled dishes. Normal cycles run 60-75 minutes including full wash, rinse, and drying phases. Heavy-duty cycles for pots and heavily soiled items take 80-120 minutes. Drying adds 15-30 minutes depending on the method used. These times compare favorably to full-size dishwashers, which typically require 90-150 minutes per cycle.
Countertop dishwashers use 2-3 gallons (7.5-11 liters) of water per complete cycle. This includes all wash and rinse phases. By comparison, hand-washing the same load consumes 8-27 gallons depending on technique, while full-size dishwashers use 4-6 gallons per cycle. The efficiency advantage comes from recirculation systems that reuse water multiple times with filtration, rather than running water continuously. For small households running half-empty full-size loads, countertop dishwashers conserve significant water annually.
Countertop dishwashers represent an elegant engineering solution to a common problem. By combining a dual-hose connection system with the same internal components found in full-size units, they deliver genuine dishwashing convenience without permanent installation.
Understanding how countertop dishwashers work reveals their true value proposition. The five-phase operation (filling, washing, rinsing, draining, drying) uses pressurized spray arms, recirculating pumps, and internal heating elements to achieve cleaning results comparable to built-in models. Water consumption of 2-3 gallons per cycle beats both hand-washing and half-empty full-size loads.
These appliances excel for specific lifestyles. If you live in a small apartment, rent your home, travel in an RV, or simply lack a built-in dishwasher, countertop models provide legitimate cleaning power in a portable package. The daily hose connection becomes routine within days, and the time savings (30+ minutes daily) quickly justify the investment.
Success requires matching the appliance to your needs. Consider capacity constraints honestly, measure your available counter space, and verify faucet compatibility before purchasing. Proper setup, regular maintenance, and understanding error codes like E1 and E4 ensure years of reliable service.
After months of daily use, I can confirm countertop dishwashers work exactly as advertised. They are not perfect for every situation, but for the right user, they transform daily life. If you are ready to explore specific models, our guide to the best countertop dishwashers provides detailed reviews and recommendations to help you choose the perfect unit for your kitchen in 2026.