Physical Address
304 North Cardinal St.
Dorchester Center, MA 02124
Physical Address
304 North Cardinal St.
Dorchester Center, MA 02124

You press the button, hear the vacuum motor whir, and wait for that satisfying click that means your food is sealed and safe. But then you notice the bag is loose, air is leaking back in, or the seal line looks crooked and incomplete. A vacuum sealer not sealing properly is one of the most frustrating kitchen appliance problems because it defeats the entire purpose of the machine.
I have spent hours troubleshooting vacuum sealers over the years, from budget countertop models to professional chamber units. The good news is that most sealing problems stem from just a handful of causes that you can diagnose and fix yourself without calling a repair technician. This guide walks you through every common cause, solution, and prevention strategy to get your vacuum sealer working like new.
Whether you use your sealer for sous vide cooking, bulk meal prep, or preventing freezer burn on expensive meat cuts, the troubleshooting steps below will help you restore that airtight seal you depend on.
When your vacuum sealer is not sealing, the cause usually falls into one of six categories. Here is the fastest way to diagnose your problem:
1. Dirty or worn sealing gaskets: Check the upper and lower foam gaskets for food debris, cracks, or compression. Clean with warm soapy water or replace if damaged.
2. Improper bag placement: Ensure the bag opening sits flat in the vacuum channel with no wrinkles or creases across the seal line. Leave at least 3 inches of headspace.
3. Moisture interference: Liquid in the seal area prevents proper heat fusion. Pre-freeze moist foods for 10-30 minutes or use the moist setting if available.
4. Sealing bar not heating: A failed heat element cannot melt the bag layers. Test by feeling for warmth during the seal cycle or checking for visible damage.
5. Overheating: Continuous use triggers thermal protection. Allow 20-30 minutes cool-down between batch sealing sessions.
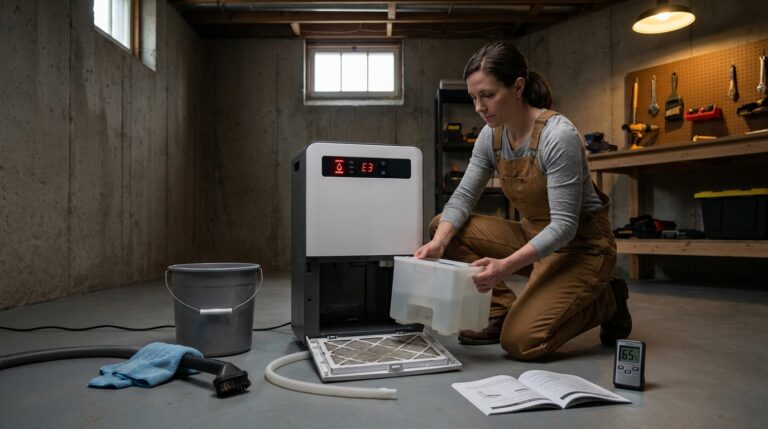
6. Vacuum pump issues: Weak or no suction indicates pump failure, clogged channels, or electrical problems requiring deeper diagnosis.
Understanding why your vacuum sealer fails helps you apply the right fix instead of guessing. Each cause produces slightly different symptoms, so pay attention to what your machine is doing.
The sealing gasket is the foam strip that creates airtight contact between the lid and the bag. On most home vacuum sealers, there are two gaskets: an upper gasket attached to the lid and a lower gasket in the base.
Over time, these foam strips compress, develop cracks, or accumulate food debris that breaks the airtight seal. Many users on forums report that simply pushing down firmly on the lid while sealing temporarily fixes the problem. This is a telltale sign of worn gaskets that need replacement.
Check your gaskets by running your finger along the foam. Look for flat spots where the foam has lost its springiness, visible cracks, or sticky residue from previous sealing sessions. If the gasket feels hard or brittle instead of soft and yielding, it is time for a replacement.
The most common user error causing seal failures is incorrect bag positioning. The open end of the bag must lie completely flat across the vacuum channel with no wrinkles crossing the seal line.
Wrinkles act as channels for air to leak back into the bag after sealing. This is why experienced users always leave at least 3 inches of empty bag space (headspace) above the food. Trying to save bag material by overfilling is a false economy that results in failed seals and wasted food.
Another placement issue occurs when the bag curls or folds at the edges. Some users report success by placing a small weight on the bag during the vacuum cycle to keep it flat, though this requires careful placement to avoid blocking the vacuum channel.
Moisture is the enemy of heat sealing. When liquid gets drawn into the seal area, it prevents the heated sealing bar from properly melting the plastic layers together. This results in weak seals that fail within hours or immediately.
Many vacuum sealers include a moist mode that adds extra heating time to compensate for moisture, but this only works for lightly moist foods. For soups, marinated meats, or wet vegetables, you need a different approach.
The most effective technique shared by experienced users is partially freezing moist items before sealing. A 10-30 minute stay in the freezer firms up the surface moisture without freezing the food solid. This creates a moisture barrier that stays clear of the seal line during vacuuming.
The sealing bar (also called the heat strip or heating element) is the metal strip that heats up to fuse the bag layers. If this element fails, you will see the vacuum process complete but the bag remains unsealed or partially sealed.
Test the sealing bar by running a seal-only cycle (no vacuum) and carefully feeling near the seal line immediately after. You should detect warmth. If the bar stays cool, the heating element has likely burned out.
Visible damage is another indicator. Look for discoloration, warping, or gaps in the heating wire. Some sealers have replaceable heat strips, while others require professional repair. Check your user manual to determine which type you own.
Vacuum sealers generate significant heat during operation, especially the sealing bar. Most models include thermal protection that shuts down the heating element when internal temperatures get too high.
If your sealer works for the first few bags but then stops sealing properly, overheating is the likely culprit. Users report that batch sealing sessions often trigger this problem, particularly in warm kitchens or during summer months.
The solution is simple but requires patience: allow 20-30 minutes of cool-down time between heavy use periods. Some high-end models have built-in cooling fans and can handle longer sessions, but most home units need these breaks to maintain consistent performance.
When your sealer runs but creates weak suction or no suction at all, the vacuum pump is the primary suspect. This is the motor and piston system that draws air from the bag.
Pump problems manifest as incomplete vacuuming (air remains in the bag) or the motor running but no air being removed. First check for blockages in the vacuum channel, as debris can prevent proper airflow even with a working pump.
If the channel is clear but suction remains weak, the pump seals may be worn or the motor may be failing. Chamber sealers use different pump systems than suction sealers, so diagnosis differs between types. We will cover those differences in the next section.
Now that you understand the causes, here is how to systematically diagnose and fix each problem. Work through these steps in order for the fastest resolution.
Start with the most common cause. Open the lid and examine both the upper and lower gaskets under good lighting.
Step 1: Remove loose debris with a soft brush or dry cloth. Do not use sharp objects that could damage the foam.
Step 2: Wash the gaskets with warm water and mild dish soap. Some manufacturers recommend removing the gaskets for thorough cleaning; check your manual.
Step 3: Dry completely with a lint-free cloth. Any remaining moisture can interfere with the seal.
Step 4: Test the seal on an empty bag. If problems persist and the foam feels compressed or cracked, order replacement gaskets specific to your model.
Many FoodSaver and other brand gaskets cost between $10-20 and take 5 minutes to install. This simple replacement often restores a failing machine to like-new performance.
Mastering bag placement prevents the most common user errors.
Step 1: Fill the bag leaving at least 3 inches of empty space at the top. This headspace gives the machine room to grip and seal without interference from bag wrinkles.
Step 2: Smooth the bag opening between your fingers to eliminate any curls or folds.
Step 3: Position the bag so the open end extends 1-2 inches into the vacuum channel. Do not push it too far or the machine may struggle to grip properly.
Step 4: Ensure the bag lies flat with no wrinkles crossing the seal line. Hold the bag gently taut during the first second of vacuuming to prevent bunching.
If you consistently struggle with wrinkles, consider using pre-cut bags sized appropriately for your typical portions rather than cutting from rolls.
Sealing wet foods requires technique adjustments.
Step 1: Select the moist or wet setting if your machine has one. This extends the seal time to compensate for moisture.
Step 2: For very wet items like soups or stews, freeze the bag upright until the contents are solid (usually 2-4 hours). Then seal the frozen block normally.
Step 3: For marinated meats, pat the surface dry with paper towels before bagging. Then freeze for 10-30 minutes to firm up the surface.
Step 4: Consider using paper towel barriers. Fold a paper towel and place it in the bag between the food and the seal line to absorb any liquid drawn up during vacuuming.
Some experienced users also mention that high-quality vacuum sealer bags with thicker construction resist moisture interference better than thin generic bags.
Diagnosing heat element problems requires careful observation.
Step 1: Run a seal-only cycle with no bag inserted. Listen for the normal operational sounds.
Step 2: Immediately after the cycle completes, carefully touch near the seal line area. Warning: it should be warm but not hot enough to burn. If there is no warmth, the heating element has failed.
Step 3: Visually inspect the sealing bar for damage. Look for broken wires, burned spots, or gaps in the heating element.
Step 4: If your model has a removable Teflon cover over the heating element, remove it carefully and inspect the wire beneath. Replace the cover if it is torn, as this protects both the element and your bags.
Replacement heating elements are available for many popular models, though some require professional installation due to electrical connections.
Overheating is usually a user habit issue rather than a defect.
Step 1: Count how many bags you can seal before problems start. Most home sealers handle 10-20 consecutive seals depending on ambient temperature.
Step 2: When the seal quality drops, stop and unplug the unit. Let it cool for 20-30 minutes minimum. Some users place the unit near a fan to speed cooling.
Step 3: Plan batch sessions with breaks. Seal 10 bags, take a 30-minute break, then continue.
Step 4: Ensure the unit vents are not blocked. Keep the sealer on a hard, flat surface with space around all sides.
If your sealer overheats after just 2-3 seals, the cooling fan may have failed or the thermal sensor may be malfunctioning. These require professional repair.
Pump problems require deeper investigation.
Step 1: Check the vacuum channel for blockages. Remove the drip tray and look for food particles or debris in the suction port.
Step 2: Test with a new, high-quality bag. Old or incompatible bags may not hold vacuum even with a working pump.
Step 3: Listen to the pump sound. A healthy pump produces steady suction noise. Grinding, clicking, or unusually loud operation indicates mechanical wear.
Step 4: For chamber sealers, check the oil level if your model has an oil-filled pump. Low oil causes weak vacuum.
If the pump runs but creates no suction after these checks, the piston seals or motor are likely worn out. At this point, replacement is usually more economical than repair for home units.
Understanding your machine type helps troubleshoot correctly because chamber sealers and suction sealers work differently and have different failure modes.
Suction sealers are the most common home models. They clamp onto the bag opening and suck air out through the channel. These require embossed or textured bags that allow air flow through channels in the bag material. Using smooth pouches with a suction sealer results in poor vacuum because the machine cannot draw air through the bag layers.
Chamber sealers place the entire bag inside a vacuum chamber. The machine removes air from the chamber, which equalizes pressure inside and outside the bag, causing the bag to collapse. Chamber sealers work with smooth pouches and handle liquids better because the liquid does not get drawn toward the seal area.
If you own a chamber sealer and experience seal failures, check the lid gasket seal and chamber pressure settings. For suction sealers, bag compatibility is often the overlooked cause of poor performance.
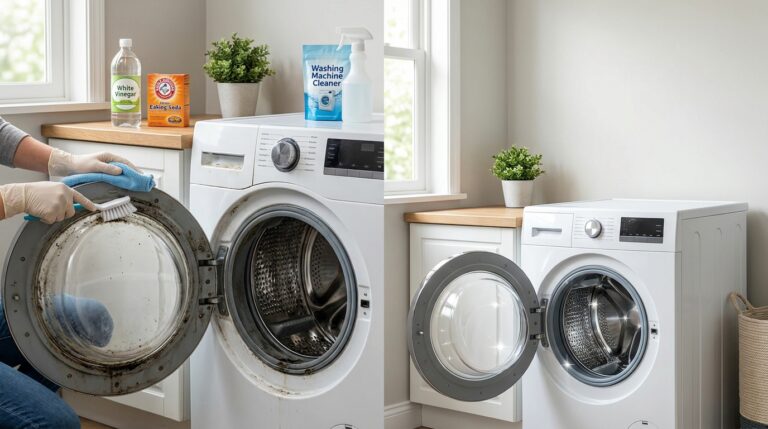
Regular maintenance prevents most sealing failures before they start. Users who follow these practices report significantly longer machine lifespans and fewer mid-session problems.
Clean gaskets weekly. Even if you do not see visible debris, oils from food and hands gradually degrade gasket foam. A quick wipe with a damp cloth takes 30 seconds and prevents compression damage.
Empty and clean the drip tray after each use. Collected liquid can overflow into the vacuum channel or attract pests. Many users report that neglected drip trays are a hidden source of odors and bacteria.
Store with the lid open or unlocked. Keeping the lid closed compresses the gaskets permanently, reducing their lifespan. Prop the lid open when not in use to let the foam recover its shape.
Use double-sealing for critical items. Create your first seal, then move the bag up half an inch and create a second seal line. This provides backup protection if one seal has a weak spot.
Keep replacement gaskets on hand. When you notice your current gaskets are wearing, order replacements immediately. Do not wait for complete failure.
Follow the 20-30 minute cool-down rule. Even if your machine seems to handle long sessions, repeated overheating accelerates wear on the heating element and reduces its lifespan.
This usually indicates a weak vacuum pump, blocked vacuum channel, or bag compatibility issues. Check for debris in the suction port, ensure you are using embossed bags with suction sealers, and listen for unusual pump noises that indicate mechanical wear. Pre-freezing moist foods can also help because liquid drawn into the channel reduces suction power.
Air entering during sealing indicates a break in the airtight seal between the lid and bag. Check for dirty or worn gaskets, wrinkles in the bag crossing the seal line, or insufficient lid pressure. Pushing down firmly on the lid while sealing can temporarily help with worn gaskets, but replacement is the proper fix.
Bags fail to seal due to moisture in the seal area, overheating causing weak heat application, bag wrinkles preventing full contact, or a failed heating element. Ensure the bag opening is dry, allow 20-30 minutes cool-down between sessions, smooth all wrinkles, and test that the sealing bar heats up during operation.
Most FoodSaver models do not have a traditional reset button. To reset, unplug the unit for 60 seconds to clear any error states, then plug it back in. For persistent issues, remove and reseat the gaskets, clean the drip tray, and ensure the lid is completely unlocked before opening. Check your specific model manual as some newer models have different procedures.
Allow 20-30 seconds between individual bags for light use. For batch sessions of 10 or more bags, allow 20-30 minutes of cool-down time to prevent overheating. If you notice seal quality declining during a session, stop immediately and let the unit cool completely before continuing.
Remove loose debris with a soft brush or cloth. Wash with warm water and mild dish soap, then dry completely with a lint-free towel. Some models have removable gaskets for thorough cleaning. Never use sharp objects, abrasive cleaners, or bleach as these damage the foam. Clean weekly for optimal performance.
A vacuum sealer not sealing properly is frustrating, but most problems are fixable with the steps above. Start with the simplest solutions: clean the gaskets, check your bag placement, and let the unit cool down. These three actions resolve the majority of sealing issues.
If you have tried all troubleshooting steps and the sealer still fails, it is time to consider replacement. Professional repair for home vacuum sealers rarely makes financial sense unless you own a high-end chamber model costing $500 or more. For typical $50-150 countertop units, replacement parts and labor often exceed the cost of a new machine.
When shopping for a replacement, consider models with removable and replaceable gaskets, moist food settings, and overheat protection features. These design elements prevent the problems you just experienced and extend the useful life of your investment.
Your food preservation workflow depends on reliable sealing. Take the time to maintain your machine properly, and it will serve you well for years of meal prep, freezer organization, and sous vide cooking adventures.