Physical Address
304 North Cardinal St.
Dorchester Center, MA 02124
Physical Address
304 North Cardinal St.
Dorchester Center, MA 02124

You open the freezer door expecting a full bin of ice cubes, but instead find a disappointing handful. Whether you are hosting a summer barbecue, mixing evening cocktails, or just trying to keep your family’s drinks cold, a slow ice maker can be incredibly frustrating. I have spent years troubleshooting appliances, and ice maker issues rank among the most common complaints homeowners face.
A slow ice maker typically produces less than 2 pounds of ice per day or takes more than 90 minutes to complete a single batch. Most modern refrigerators should generate 3 to 5 pounds of ice daily under normal conditions. If your ice maker too slow is causing daily inconvenience, the good news is that most fixes are simple, inexpensive, and take less than 30 minutes to complete.
This guide covers everything from basic maintenance to brand-specific troubleshooting for French door refrigerators, side-by-side models, and traditional top-freezer units. By the end, you will know exactly how to diagnose your problem and restore full ice production.
Before diving into fixes, you need to know what constitutes “normal” ice production. Many homeowners panic about slow ice when their unit is actually performing within manufacturer specifications. The truth is, ice maker production varies significantly based on your refrigerator type and age.
Under optimal conditions, most residential ice makers produce ice at the following rates:
| Refrigerator Type | Daily Ice Output | Time Per Batch | Cubes Per Batch |
|---|---|---|---|
| Side-by-Side | 3-4 lbs (100-130 cubes) | 90-100 minutes | 8-10 cubes |
| French Door | 2.5-3.5 lbs (80-110 cubes) | 100-120 minutes | 6-9 cubes |
| Top Freezer | 3.5-5 lbs (120-160 cubes) | 80-100 minutes | 10-12 cubes |
| Bottom Freezer | 3-4 lbs (100-130 cubes) | 90-110 minutes | 8-10 cubes |
These benchmarks assume a freezer temperature between 0 and 5 degrees Fahrenheit, proper water pressure (20-120 PSI), and a clean water filter. Production naturally drops during summer months when ambient kitchen temperatures rise above 75 degrees. If your ice maker falls significantly below these numbers consistently, you have a genuine slow ice maker problem that needs addressing.
Understanding why your ice maker is slow helps you target the right solution. In my experience, about 70% of slow ice maker cases stem from just three issues: freezer temperature problems, clogged water filters, and frequent door openings. Here are the most common culprits:
The fix you need depends on which factor applies to your situation. Most homeowners can resolve the first six issues without professional help.
Follow these steps in order for the fastest results. I have arranged them from easiest to most involved, starting with the fixes that resolve the majority of slow ice maker cases.
The most common cause of slow ice production is a freezer that is not cold enough. Your ice maker needs consistent temperatures between 0 and 5 degrees Fahrenheit to operate efficiently.
Start by placing an accurate appliance thermometer in the freezer, ideally near the ice maker. Leave it for 4-6 hours, then check the reading. If it shows anything above 5 degrees, lower your freezer thermostat by one setting. Wait 24 hours and check again. Avoid setting the temperature below 0 degrees, as this can cause other problems like freezer burn on food.
Many homeowners discover their freezer was set to 10-15 degrees, which explains the sluggish ice production. Lowering to the proper range often doubles ice output within 48 hours.
A clogged water filter restricts water flow to the ice mold, causing two problems: the mold fills too slowly, and the resulting ice cubes are smaller and harder to eject. Most manufacturers recommend replacing filters every 6 months, but households with hard water may need replacements every 3-4 months.
Locate your filter, usually inside the refrigerator compartment or at the base grille. Remove the old filter and install a manufacturer-approved replacement. Critical step: run 2-3 gallons of water through the dispenser before using ice. This flushes carbon fines and air from the lines. Many users skip this step and wonder why their ice tastes odd or production remains slow.
If you are unsure which filter to buy, check your refrigerator’s model number and consult the owner’s manual. Using off-brand filters can actually reduce flow rates further. For households with persistent water quality issues, consider upgrading to one of our recommended water filtration systems for better overall performance.
Your freezer door seal, also called a gasket, creates an airtight barrier that keeps cold air in and warm air out. Over time, seals accumulate food residue, crack, or lose their magnetic grip.
Test your seal using the “dollar bill test.” Close the freezer door on a dollar bill so half sticks out. Try pulling the bill. If it slides out easily with minimal resistance, your seal is leaking air. Repeat this test at multiple points around the door.
Clean the seal with warm water and mild detergent, paying special attention to the grooves where debris collects. Dry thoroughly and apply a thin layer of petroleum jelly to keep the rubber supple. If you find tears, gaps, or persistent leaks, replace the gasket. A new seal typically costs $30-80 and takes 30 minutes to install.
The water line that feeds your ice maker can freeze, kink, or become clogged with mineral deposits, especially in areas with hard water. A restricted line means the ice mold fills slowly or incompletely.
First, check the water inlet valve located at the back of your refrigerator. Ensure the supply line is not kinked or pinched. If your kitchen has a saddle valve piercing the water pipe, consider replacing it with a proper shutoff valve. Saddle valves often restrict flow.
For frozen lines, turn off the refrigerator and leave the freezer door open for 30-60 minutes. You can speed this up by using a hair dryer on low heat, keeping it moving to avoid melting plastic components. Once thawed, run water through the dispenser to confirm full flow.
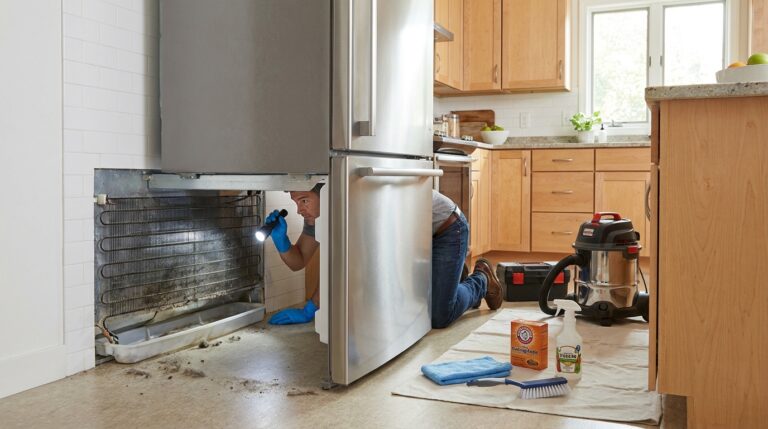
Condenser coils, located either behind the refrigerator or underneath behind the toe grille, release heat from the refrigerant. When coated with dust, pet hair, or kitchen grease, they cannot efficiently dissipate heat. This forces your refrigerator to run longer and work harder, often leaving the freezer warmer than desired.
Unplug the refrigerator and locate the coils. Use a coil brush or vacuum with a brush attachment to remove all debris. Work gently to avoid bending the delicate fins. Pay special attention to the spaces between coils where dust accumulates. For greasy buildup, spray with a degreaser, wait 10 minutes, then wipe clean.
Cleaning your coils every 6 months maintains optimal refrigerator efficiency and prevents slow ice production. This simple 15-minute task can improve cooling performance by 10-15%.
The evaporator fan circulates cold air throughout the freezer compartment. If this fan stops working or runs slowly, cold air pools at the bottom while the ice maker area warms up.
Open the freezer and listen. You should hear a steady whirring sound when the compressor runs. If the fan is silent, makes grinding noises, or runs intermittently, it likely needs replacement. You can test this by holding the freezer door switch closed (the light should turn off) and feeling for airflow from the vents near the ice maker.
Replacing a freezer fan is a moderate DIY project requiring basic tools. The part costs $30-60, and online tutorials for your specific model can guide you through the process.
Both overloading and underloading your freezer affect ice production. A packed freezer blocks air vents and prevents proper circulation. An empty freezer has poor thermal mass, causing temperatures to fluctuate wildly when the door opens.
Aim to keep your freezer about 75-85% full. Fill gaps with water bottles, which freeze solid and help maintain stable temperatures. Ensure nothing blocks the air vents near the ice maker. Leave a few inches of clearance around the ice maker unit itself for proper airflow.
If you frequently find your freezer nearly empty, consider storing extra bread, frozen vegetables, or ice packs to maintain thermal stability. This simple adjustment can improve ice production speed by 15-20%.
Sometimes your ice maker simply needs a restart to clear error states or recalibrate after repairs. The reset process varies by brand, but generally involves one of these methods:
After resetting, discard the first 2-3 batches of ice, as they may contain air bubbles or debris flushed from the lines. Normal production should resume within 24 hours.
While the steps above apply to most refrigerators, certain brands have known quirks and specific issues. Here is what to watch for with the most popular manufacturers:
Samsung French door models are notorious for ice maker issues. The ice maker compartment is often located in the refrigerator section rather than the freezer, making it susceptible to temperature fluctuations. If your Samsung ice maker is slow, first verify the ice room maintains 0-5 degrees. Some models have a separate evaporator for the ice room that can ice up, requiring manual defrosting.
Check for ice buildup around the ice maker unit itself. Samsung has issued service bulletins for several models regarding this issue. If you see frost accumulation, perform a forced defrost by holding the Freezer and Lighting buttons simultaneously for 8-10 seconds until the display beeps.
LG French door refrigerators often use a unique ice maker design located in the door. This saves space but can lead to slower production if the freezer door seals poorly. Inspect the door gasket carefully on LG models. Additionally, some LG ice makers have a test button that runs a forced cycle. Press and hold this button for 3 seconds to verify the unit can complete a full cycle normally.
LG also uses a specific water filter design that must be installed with the arrow pointing in the correct direction. An improperly installed filter restricts flow more severely than on other brands.
Whirlpool and KitchenAid models often use the “twist tray” ice maker design. The tray twists to eject cubes, and this mechanism can bind if ice cubes are too large or the tray is warped. If your Whirlpool ice maker produces normal-sized cubes but ejects slowly or incompletely, the tray may need replacement.
Whirlpool ice makers also have a convenient on/off switch on the ice maker itself. Verify this switch is in the “on” position, as accidental bumps can turn the unit off.
GE Profile and GE Cafe models often feature advanced ice makers with separate controls. Check your owner’s manual for a “Quick Ice” or “Ice Plus” mode that temporarily increases production speed by 50% for 24-48 hours. This is ideal when preparing for parties.
GE ice makers are also sensitive to water pressure. If your home has a reverse osmosis system, you may need a booster pump to provide adequate pressure (minimum 40 PSI) for the ice maker to function properly.
Frigidaire models often produce crescent-shaped ice cubes. If these cubes are too small or hollow, the water inlet valve may be failing or water pressure is inadequate. Check that the saddle valve supplying water to the refrigerator is fully open.
Frigidaire Gallery and Professional series have a “PureSource Ultra” water filter that must be properly seated to avoid leaks and flow restrictions. Push firmly until you hear a click when installing.
While most slow ice maker issues are DIY-friendly, certain problems require professional expertise. Attempting repairs beyond your skill level can damage your refrigerator or void warranties. Call a technician if you encounter any of the following:
Professional appliance repair typically costs $100-200 for diagnosis and $150-400 for common repairs like ice maker replacement. For high-end smart refrigerators with ice makers, technicians familiar with advanced electronic controls are essential. Understanding your refrigerator power consumption can also help diagnose electrical issues when you speak with a repair professional.
The most common causes are freezer temperature above 5 degrees Fahrenheit, a clogged water filter past its 6-month replacement date, or frequent door openings that let warm air in. Less common causes include damaged door seals, low water pressure below 20 PSI, or dirty condenser coils affecting overall cooling efficiency.
Start by lowering your freezer temperature to 0-5 degrees Fahrenheit. Replace the water filter if it is older than 6 months. Reduce door opening frequency, clean door seals to ensure proper closure, and clean condenser coils every 6 months. For immediate needs, use the Quick Ice or Power Freeze mode if your model has one.
A typical ice maker cycle takes 90-120 minutes to produce one batch of 8-10 cubes. Under optimal conditions, you should get 3-5 pounds of ice per day. If your ice maker takes longer than 2 hours per batch or produces less than 2 pounds daily, it is running slow and needs troubleshooting.
Shrinking ice cubes usually indicate low water pressure or a partially clogged water filter. The ice mold is not filling completely, resulting in smaller cubes. Check your water supply line for kinks, replace the water filter, and verify your home water pressure is at least 20 PSI. Reverse osmosis systems often require booster pumps for adequate ice maker performance.
Repair makes sense for simple fixes like replacing a water filter, cleaning coils, or fixing door seals that cost under $100. Consider replacement if the ice maker module itself has failed (repair cost $200-400), your refrigerator is over 10 years old, or you have repaired the same component multiple times. Newer energy-efficient models may have inherently slower ice makers by design.
A slow ice maker is frustrating, but as this guide demonstrates, most causes are easily fixed without professional help. Start with the basics: verify your freezer temperature is 0-5 degrees Fahrenheit, replace any water filter older than 6 months, and ensure your door seals are clean and intact. These three steps resolve the majority of slow ice production issues.
If your ice maker too slow problem persists after trying all eight steps, consult the brand-specific troubleshooting section for your refrigerator model. Remember that some newer energy-efficient refrigerators are designed to produce ice more slowly than older models, so check your owner’s manual for expected production rates.
With regular maintenance including filter replacements, condenser coil cleaning, and proper freezer loading, your ice maker should provide years of reliable service. Keep this guide bookmarked for the next time your ice production drops, and you will be back to full cubes within 24 hours.