Physical Address
304 North Cardinal St.
Dorchester Center, MA 02124
Physical Address
304 North Cardinal St.
Dorchester Center, MA 02124

You walk over to your thermostat on that first warm spring day, dial it down to 72 degrees, and wait for the cool air to flow. Nothing happens. Your air conditioner won’t start after winter, and you’re already sweating just thinking about the repair bill. I’ve been there myself, standing in front of a silent outdoor unit, wondering what went wrong during those months of hibernation.
Here’s the good news: about 80% of AC startup failures after winter are caused by simple issues you can fix yourself in under 30 minutes. No service call required. No expensive parts. Just basic troubleshooting that anyone can handle with a little guidance.
This guide walks you through exactly what to check, in the right order, to get your AC running again. We’ll cover everything from dead thermostat batteries to that mysterious humming sound your outdoor unit makes when the capacitor fails. By the end, you’ll know whether you need a quick DIY fix or if it’s time to call a professional.
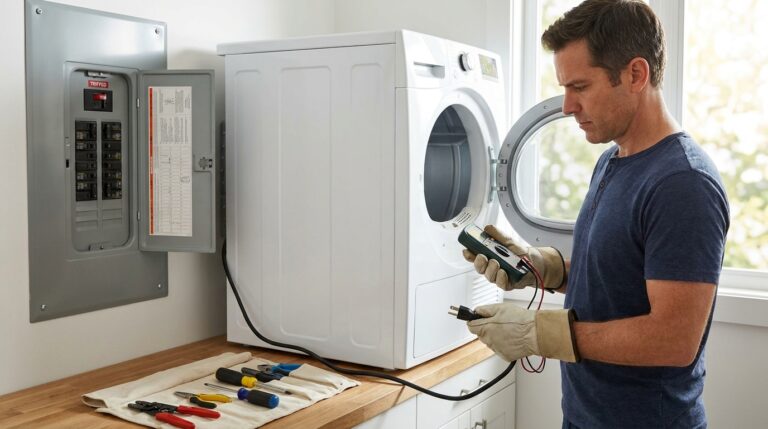
Your air conditioner runs on 240-volt electricity, which can seriously hurt you. Before touching anything other than your thermostat, make sure you understand what’s safe and what isn’t.
Safe DIY tasks include checking thermostat settings, replacing air filters, resetting breakers, and inspecting the outdoor unit visually. Never open electrical panels, touch capacitor terminals, or attempt refrigerant work. Those tasks require training and specialized tools.
If you smell burning, see sparks, or notice exposed wiring with chew marks, stop immediately and call a professional. Some problems aren’t worth the risk, no matter how handy you are.
When your AC won’t start after winter, work through these six checks in order. They take about 15 minutes total and solve most startup problems.
If you’ve checked all six and your AC still won’t start, move on to the detailed troubleshooting steps below. Each section dives deeper into the most common causes of post-winter AC failures.
Follow these steps in order. Skip any you’ve already tried from the quick checklist, but don’t jump ahead. AC troubleshooting works best when you’re methodical.
It sounds obvious, but thermostats cause more confusion than any other AC component. Start here and save yourself unnecessary work outside.
First, verify the mode setting. Many programmable thermostats default to HEAT mode after winter, or get stuck in a seasonal schedule. Press the MODE button until you see COOL or a snowflake icon. Then set the temperature at least 5 degrees below your current room temperature. This creates enough demand to trigger the cooling cycle.
If your thermostat display is blank, fading, or flashing low battery warnings, replace the batteries. Even hardwired thermostats often have battery backup that affects operation. Use fresh alkaline batteries and note the positive and negative orientation before removing the old ones. Wait five minutes after battery replacement before testing again.
Smart thermostats like Nest or Ecobee sometimes need a software reset after long periods of inactivity. Check your app for error messages or try cycling the power at the breaker for 30 seconds. If you’re dealing with Braeburn thermostat issues, those units have specific reset procedures worth reviewing.
Your AC system uses two separate power sources: one for the indoor air handler (usually 120V) and one for the outdoor condenser (240V). Both need to work.
Open your main electrical panel and look for breakers labeled AC, A/C, Air Conditioner, Condenser, or HVAC. They might be single breakers or a connected pair (double-pole). A tripped breaker sits in the middle position between ON and OFF. To reset it, push firmly to OFF first, then back to ON until you feel or hear it click.
If the breaker trips immediately when you reset it, stop. That indicates a short circuit or serious electrical fault. Don’t keep trying. Call a professional. Repeated breaker trips can damage your compressor and create fire hazards.
Some systems also have fuses in a disconnect box near the outdoor unit. These cartridge fuses blow when power surges hit. You’ll need a multimeter to test them properly, or you can do a visual inspection for blackening or broken filaments. Never bypass fuses with metal objects. That’s how houses burn down.
A dirty air filter does more than reduce airflow. It can actually prevent your AC from starting entirely by triggering safety switches or causing the system to freeze up.
Locate your return air filter, usually in a hallway ceiling, wall, or inside the air handler cabinet. Slide it out and hold it up to a light. If you can’t see light passing through, it’s too dirty. Replace it with a new filter of the same size, printed on the cardboard edge. The arrow on the filter frame should point toward the air handler (in the direction of airflow).
During winter, filters can accumulate surprising amounts of dust from heating system operation. Even if you replaced it in fall, check it again in spring. A $15 filter replacement can save you a $150 service call.
After replacing the filter, wait 30 minutes before trying to start the AC if you suspect frozen evaporator coils from restricted airflow. Starting immediately can damage the compressor. If ice was the problem, learn how to unfreeze your AC unit safely before restarting.
The service disconnect is a safety switch that cuts power to your outdoor unit for maintenance. It’s typically a gray metal box mounted on the exterior wall near your condenser, or sometimes a pull-out handle on the unit itself.
Open the disconnect box and look inside. You should see either a pull-out handle with fuses, or a lever switch. If the handle is removed or the switch is in the OFF position, your outdoor unit has no power. Some homeowners or HVAC technicians pull this disconnect for winter maintenance and forget to reinstall it come spring.
For pull-out style disconnects, the handle must be fully inserted with the fuses intact. For lever switches, flip it to ON. If you’re unsure which position is which, look for labels or try both directions. You can’t damage anything by switching it the wrong way once.
After checking the disconnect, go inside and try the thermostat again. Wait five minutes for the system pressure to equalize before the compressor attempts to start. Modern AC systems have built-in delays to protect the compressor from short-cycling.
Now it’s time to look at the outdoor unit itself. Walk outside and examine the condenser for visible problems that developed over winter.
Clear any debris within two feet of the unit. Leaves, grass clippings, and trash accumulate against the base and block airflow. Remove sticks, branches, and any objects that fell against the coils during winter storms. Trim back vegetation that’s grown too close. Your condenser needs breathing room.
Look at the aluminum fins on all sides of the unit. If they’re flattened or bent, airflow is restricted. You can straighten minor damage with a fin comb from a hardware store, but severe damage needs professional attention. Don’t use a pressure washer on the coils. The high pressure bends fins and pushes dirt deeper.
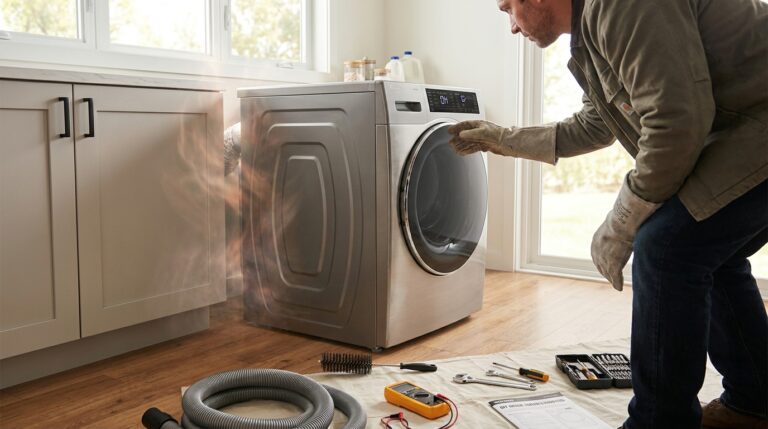
Listen for unusual sounds. A loud hum that fades after a few seconds often means a failed capacitor. Clicking sounds suggest relay problems. Complete silence combined with a warm compressor indicates power issues you already checked, or a seized motor.
Check for rodent damage. Mice and squirrels love nesting in AC units during winter. Look for chew marks on the wiring insulation, nesting materials in the electrical compartment, or droppings around the base. If you find evidence of chewing, call a professional. Damaged wiring creates fire hazards and requires proper repair.
Your AC removes humidity from the air, creating water that drains away through a PVC pipe. When that drain clogs, water backs up and triggers a safety switch that shuts down the entire system.
Find your indoor air handler, usually in the attic, basement, or a closet. Look for a PVC pipe exiting the cabinet, often with a clear trap or access tee. If you see water around the unit or in the drain pan below it, you have a clog.
Many systems have a float switch in the drain pan or inline with the drain pipe. This switch detects rising water and cuts power to prevent overflow damage. Once triggered, the AC won’t start again until the water drains and the switch resets.
To clear a clog, try these methods in order: First, use a wet/dry vacuum on the outdoor end of the drain line (where it exits your house). Suction usually pulls out algae and sludge buildup. Second, flush the line with a 50/50 bleach and water solution poured into the access port near the air handler. Let it sit 30 minutes, then flush with clean water.
If your system has a float switch, you may need to manually reset it after clearing the clog. Some switches have a reset button; others reset automatically when water recedes. Check your owner’s manual or look for a small button on the switch assembly.
The sounds your AC makes when it tries to start tell you what’s wrong. Learn this diagnostic code and you’ll know immediately whether you’re dealing with a simple fix or a component failure.
Humming but the fan doesn’t spin: This almost always indicates a failed capacitor. The capacitor stores electrical charge to jump-start the compressor and fan motor. After a long winter, capacitors can lose their charge capacity or fail entirely. You might hear a loud hum for 10-30 seconds, then silence as the thermal overload shuts the unit down to prevent damage. Capacitor replacement costs $150-400 professionally, or $20-50 if you DIY (but this is advanced work involving high voltage).
Clicking repeatedly every few seconds: The contactor relay is trying to engage but failing. This electrical switch controls power to the compressor and outdoor fan. Clicking without startup usually means the contactor is worn out, or there’s a low voltage problem from the transformer. Contactors wear out faster in humid climates and after winter moisture exposure.
Complete silence: No power is reaching the outdoor unit. Recheck your breakers, fuses, and service disconnect. If those are all correct, you may have a wiring break, transformer failure, or control board problem. These require professional diagnosis with a multimeter and electrical knowledge.
Buzzing or chattering: Often indicates a failing compressor or loose electrical connections. Compressors can develop “hard start” syndrome after winter inactivity, where the motor struggles to overcome initial resistance. A hard start kit sometimes helps, but buzzing usually means professional attention is needed.
Loud clanking or grinding: Stop the unit immediately. These sounds indicate mechanical failure, bearing seizure, or broken internal components. Continuing to run the AC will destroy the compressor and require complete replacement.
Knowing your limits saves money and keeps you safe. Here’s a clear breakdown of which AC problems are DIY-appropriate and which require a licensed HVAC technician.
Safe DIY repairs: Thermostat battery replacement, air filter changes, breaker resets, debris clearing from the outdoor unit, drain line flushing, and basic visual inspections. These tasks require no special tools and pose minimal risk. Most homeowners can handle them with confidence.
Professional-only repairs: Capacitor replacement, contactor replacement, refrigerant work, electrical troubleshooting, compressor repair, and control board replacement. These tasks involve high voltage, specialized tools, EPA certification (for refrigerant), or complex diagnostics that require training.
Here’s what common repairs typically cost when done professionally versus DIY:
The math is clear: if your issue is one of the DIY items, handle it yourself. For electrical or refrigerant problems, the safety risks and equipment costs make professional service the smarter choice.
An ounce of prevention really is worth a pound of cure when it comes to air conditioning. A few simple steps in fall can prevent nearly all the spring startup headaches we’ve covered.
Change your filter before you shut down for winter. Don’t let a dirty filter sit in the system for months. The trapped moisture and organic material create a breeding ground for mold and bacteria that can clog your system come spring.
Clear debris around the outdoor unit in fall. Those leaves that blow around in October will freeze against your condenser in January if you don’t remove them. Give the unit a 2-foot clearance on all sides.
About covers: The debate continues, but here’s the practical truth. In mild climates, skip the cover. It traps moisture and invites rodents. In harsh climates with heavy snow and ice, a breathable cover helps protect the coils. If you cover, use only a purpose-made AC cover with ventilation panels, and remove it the moment temperatures rise above freezing consistently.
Run your AC for 10 minutes once a month during winter. Yes, even when it’s cold outside. This keeps the compressor seals lubricated, prevents refrigerant from settling in damaging positions, and moves oil through the system. Just switch it on at the thermostat, let it run, then switch back to heat.
Schedule professional maintenance in spring. An annual tune-up catches capacitor degradation, refrigerant leaks, and electrical issues before they cause complete failures. The $100-200 cost prevents emergency repairs that cost triple. Technicians also check things you can’t see, like refrigerant pressure and compressor amp draw.
Pre-startup checklist for next spring: Before that first hot day, change your filter, clear outdoor debris, test your thermostat batteries, pour bleach through the drain line, and check your breaker status. Do this a week before you actually need cooling, so you have time to fix any issues without sweating.
Some situations demand professional expertise. Knowing when to stop troubleshooting and make the call protects your safety and prevents making small problems worse.
Call a technician immediately if: the breaker trips instantly upon reset, you smell burning or see sparks, you find chewed or damaged wiring, the compressor makes loud grinding noises, you suspect a refrigerant leak (ice on the refrigerant lines, hissing sounds, or oily residue), or the unit is completely dead after checking all basic power sources.
Also call if you’ve tried all the DIY steps in this guide and your AC still won’t start. At that point, you’re likely dealing with a failed capacitor, contactor, control board, or compressor issue that requires professional tools and parts.
When you call, describe the symptoms accurately. Mention any sounds you heard, whether the indoor fan runs, if the thermostat display works, and what troubleshooting steps you’ve already tried. This helps the technician arrive prepared with the right parts, potentially saving you a second service call.
Expect to pay a diagnostic fee of $75-150, which typically gets applied toward the repair cost if you proceed with the work. Most common repairs like capacitors and contactors can be completed in one visit. Complex issues like compressor failures or refrigerant leaks may require return visits.
The most common reasons an air conditioner won’t start after winter include: 1) Tripped circuit breaker or blown fuse from power surges, 2) Thermostat issues like dead batteries or wrong settings, 3) Clogged condensate drain that triggered the safety float switch, 4) Dirty air filter restricting airflow and triggering safety shutoffs, 5) Rodent damage to exterior wiring during winter nesting, and 6) Failed capacitor from months of inactivity. Start with the thermostat and breakers, then check the drain line and outdoor unit.
To reset your AC after winter: 1) Turn the thermostat to OFF. 2) Check and reset the circuit breaker if tripped. 3) Verify the outdoor service disconnect switch is ON. 4) Wait 5 minutes for system pressure to equalize. 5) Turn thermostat to COOL and set temperature 5 degrees below room temperature. 6) Listen for outdoor unit startup within 5 minutes. If nothing happens, check the condensate drain float switch and air filter.
To properly turn on your air conditioner after winter: 1) Remove any outdoor unit cover if used. 2) Clear debris within 2 feet of the condenser. 3) Replace the indoor air filter with a new one. 4) Open all supply and return vents throughout the house. 5) Check the drain line for clogs and clear if needed. 6) Turn on the circuit breaker 24 hours before first use if it was off. 7) Set thermostat to COOL mode with target temperature below current room temp. 8) Monitor for 15 minutes on first startup to verify normal operation.
Before your first AC startup after winter: Replace the air filter, clear all debris from around the outdoor unit, inspect visible ductwork for damage, check and replace thermostat batteries, verify the breaker is on, remove any AC cover you used, flush the drain line with a bleach solution to prevent algae, and consider scheduling professional maintenance if your system is over 5 years old. Running the system briefly once a month during winter also helps prevent spring startup issues.
A humming AC that won’t start almost always indicates a failed capacitor. The capacitor stores electrical charge to boost the compressor and fan motor during startup. After winter inactivity, capacitors can lose capacity or fail entirely. You’ll hear a loud hum for 10-30 seconds as the motor tries to start, then silence as the thermal overload shuts it down. This repair requires professional service or advanced DIY skills, as capacitors hold lethal voltage even when power is disconnected.
If your AC breaker trips immediately upon reset, stop and call a professional. This indicates a direct short circuit or serious electrical fault that creates fire hazards. Common causes include damaged wiring from rodents, failed compressor motor windings, or grounded electrical components. Do not attempt to reset the breaker again. Repeated attempts can damage your compressor and create dangerous conditions. Professional diagnosis with proper electrical testing equipment is required.
Yes, a severely dirty air filter can prevent an AC from starting. When airflow is completely blocked, safety switches may shut down the system to prevent damage. Additionally, restricted airflow can cause the evaporator coils to freeze, which triggers pressure switches that prevent compressor startup. Some smart thermostats also detect airflow problems and won’t activate the cooling cycle. Replace your filter every 1-3 months depending on usage and environmental conditions.
Basic AC troubleshooting is safe for homeowners if you stay within certain boundaries. Safe DIY tasks include checking thermostat settings, replacing batteries, changing air filters, resetting breakers, clearing outdoor debris, and inspecting for visible damage. Never open electrical panels, touch capacitor terminals, attempt refrigerant work, or handle damaged wiring. These tasks involve high voltage, EPA-regulated substances, or fire hazards. If you smell burning, see sparks, or find chewed wiring, stop immediately and call a professional.
An air conditioner that won’t start after winter is frustrating, but it’s rarely catastrophic. Most of the time, you’re dealing with a $15 filter, dead thermostat batteries, or a breaker that tripped during a winter storm. Work through the steps in this guide methodically, and you’ll likely have cool air flowing within the hour.
Remember the golden rule of troubleshooting: start simple and stay safe. Check the thermostat, check the power, check the filter, then move on to the outdoor unit. If you reach the end of this guide and your AC still won’t start, you’ve gathered valuable diagnostic information that will help the technician fix it faster.
If your AC starts but doesn’t cool properly, you’ll need to troubleshoot an AC that’s not blowing cold air as a next step. Prevention beats repair every time. Mark your calendar for monthly winter AC runs, change filters on schedule, and schedule that annual maintenance before the cooling season begins. Your future self will thank you when that first hot day arrives and your system starts perfectly the first time. If your AC does start but you notice other issues like condensation problems after AC startup or portable AC troubleshooting needs, check our related guides for specific solutions.
Stay cool, and good luck with your troubleshooting.