Physical Address
304 North Cardinal St.
Dorchester Center, MA 02124
Physical Address
304 North Cardinal St.
Dorchester Center, MA 02124

You walk into your laundry room and step into a puddle. Your heart sinks as you trace the water trail back to your front load washer. That steady drip from the door means one thing: your washer is leaking from the door, and you need to fix it fast.
After helping dozens of homeowners troubleshoot this exact problem over the past eight years, I can tell you that most door leaks are completely fixable without calling a repair technician. Whether it is a simple cleaning job or a seal replacement that takes under an hour, you have options that will not break the bank.
In this guide, I will walk you through exactly how to diagnose why your washer is leaking from the door, how to fix it yourself, and when it makes sense to call a professional. I will also share the temporary repair tricks that have saved families from laundry pile-ups while waiting for parts.
Before you start taking anything apart, let us identify the root cause. Here are the five most common reasons your front load washer is leaking from the door, with quick fixes for each:
1. Dirty or Moldy Door Seal
Fix: Clean the door gasket thoroughly with a vinegar solution and wipe away all debris.
2. Torn or Cracked Door Gasket
Fix: Replace the door seal (bellows) with a new one. Small tears may be temporarily patched with CA glue.
3. Oversudsing From Too Much Detergent
Fix: Switch to HE detergent and use only the manufacturer-recommended amount.
4. Misaligned Door or Loose Latch
Fix: Check the door alignment and tighten the latch. Level the washer if it rocks.
5. Clogged Drain Holes in the Bellows
Fix: Clear the small drain holes at the bottom of the door seal with a pipe cleaner.
Now let us look at how to confirm the leak is actually coming from the door and not somewhere else.
Not every puddle near your washer means the door seal is the culprit. I have seen homeowners replace perfectly good gaskets only to discover the real leak was coming from a pump, hose, or drain connection.
Here is how to verify the door is your problem. First, run a wash cycle and watch carefully during different phases. Does water appear during the fill cycle, the wash agitation, or the high-speed spin cycle? Door leaks often become most visible during the spin cycle when water is being thrown around with force.
Check the water location on your floor. Door leaks typically create a puddle directly in front of the washer, often wider than the machine itself. The water may also drip down the front panel. If your puddle is at the back or directly underneath the center, you likely have a pump, hose, or tub seal issue instead.
Look at the door gasket itself while the machine is running. You might see water weeping through a visible tear, or suds pushing past a compromised seal. If the water is clean and clear, it is probably from a fresh fill. Soapy water indicates drainage or oversudsing issues.
One forum member shared a brilliant tip: place a dry paper towel along the bottom edge of the door before starting a cycle. If it gets wet while the upper towels stay dry, your leak is definitely coming from the door seal area.
Understanding what causes door leaks helps you prevent them from happening again. Let us break down each common culprit in detail.
The rubber door seal, also called a bellows or door boot, creates a watertight barrier between the spinning drum and the stationary door. When mold, mildew, or detergent residue builds up on this seal, it prevents the door from closing completely against the rubber surface.
Front load washers are particularly prone to this issue because they use less water and create a sealed environment perfect for mold growth. The folds and crevices in the gasket trap moisture, lint, and soap scum. Over time, this buildup hardens and creates gaps where water escapes.
I recommend inspecting your seal monthly. Pull back the rubber folds and look for black mold spots or crusty detergent residue. Even a thin layer of buildup can compromise the seal enough to cause leaks during high-speed spin cycles.
Physical damage to the door gasket is one of the most common causes of significant leaks. Small items left in pockets are the usual culprits. A forgotten zipper pull, coin, or even a small toy can get caught between the door glass and the seal, creating a tear as the drum spins.
The location of the tear matters. A rip at the bottom of the seal causes immediate, obvious leaking because gravity pulls water down. Damage at the top or sides might only leak during high-water cycles or when the machine is heavily loaded.
Age also takes its toll on rubber gaskets. Most door seals last 5-10 years depending on use and maintenance. The rubber becomes brittle, develops cracks, and loses its elasticity. You might notice small fissures before they become full tears.
From my experience, tears smaller than half an inch can sometimes be temporarily patched, but larger damage or multiple tears require full replacement.
High-efficiency (HE) front load washers use much less water than older top-load models. This design requires specially formulated HE detergent that creates fewer suds. Regular detergent produces excessive foam that expands beyond the drum capacity.
When too many suds form, the foam pushes against the door seal with pressure the gasket was not designed to handle. The suds can force their way past even a healthy seal, creating what looks like a door leak but is actually a usage issue.
I have seen brand new washers with perfectly intact seals leaking simply because the owner used regular detergent or filled the HE detergent cup to the top line. Always check your detergent bottle for the HE symbol, and use only the minimum recommended amount for your load size.
If you see bubbles coming from around the door during the wash cycle, oversudsing is almost certainly your problem.
The door must close with even pressure all around the gasket to create a proper seal. If the latch is loose or the door is misaligned, one section of the seal may not compress fully, leaving a gap for water to escape.
Check your door by closing it and running your finger around the perimeter. You should feel consistent resistance from the rubber gasket all the way around. If one area feels loose or you can see daylight through the seal, alignment is your issue.
Door hinges can loosen over years of use, especially on washers that see heavy family loads. The door may sag slightly, creating a gap at the bottom while the top seals fine. Tightening hinge screws often fixes this completely.
An unlevel washer also causes alignment problems. If your machine rocks even slightly during the spin cycle, the door shifts against the seal, creating intermittent leaks that only happen during high-speed spins.
Most door seals have small drain holes at the bottom that allow any water trapped in the gasket folds to drain back into the drum. When these holes clog with lint, hair, or detergent buildup, water accumulates in the seal and eventually overflows onto your floor.
This issue is easy to overlook because the seal itself looks fine. You might even replace the entire gasket and still have leaks if you do not clear these drain holes. A pipe cleaner or small zip tie works perfectly to clear blockages.
Check these holes monthly as part of your washer maintenance routine. They are small but critical to proper door seal function.
While door seal problems are universal across front load washers, certain brands have quirks you should know about.
LG front load washers use a particularly tight spring clamp on the inner portion of the door boot. Many DIY repairers struggle for hours trying to reinstall this clamp by hand. The secret weapon is a pair of spring clamp pliers, sometimes called “LG washer door boot pliers.”
These specialized tools cost around $15-25 and save hours of frustration. Without them, you are trying to stretch a high-tension spring over rubber while working in tight quarters. Forum users describe this as a “magic act” without the right pliers.
LG washers also have a drain filter access panel at the bottom left that can leak if not properly tightened. Check this first to make sure your door is actually the leak source.
Samsung door gaskets commonly develop tears in two specific locations: the bottom where the drain holes are, and the inner lip where the bellows attaches to the drum. The rubber Samsung uses tends to become brittle faster than some competitors, especially if you wash frequently with hot water.
If you have a Samsung front loader that is 4-7 years old with a door leak, suspect rubber deterioration first. Many Samsung seals fail at the inner clamp area where the rubber meets the drum, creating a slow leak that worsens over time.
Whirlpool and Maytag front load washers typically use a wire clamp with a spring rather than a tension clamp. This is actually easier for DIY replacement. The outer clamp attaches to the front panel with a simple spring that you can remove with a flat-head screwdriver.
One common issue with Whirlpool models is the door boot retaining spring working its way loose over time. If your leak started suddenly after years of good performance, check whether the outer wire clamp has slipped out of position.
GE front load washers tend to have very specific door alignment requirements. If your GE washer is leaking and the seal looks intact, check the level first. Even a slight tilt can cause GE doors to shift during spin cycles.
GE also recommends specific door boot part numbers for different models. Double-check your model number when ordering replacement seals, as there are often multiple variations within the same product line.
Before you spend money on a replacement seal, try cleaning your existing gasket thoroughly. About 30% of door leaks I diagnose are resolved with nothing more than a deep cleaning.
Gather white vinegar, a spray bottle, a soft cloth or sponge, an old toothbrush, and a pipe cleaner or zip tie. Avoid harsh abrasive cleaners that could damage the rubber.
Open the washer door completely and pull back the rubber gasket to expose the inner surfaces. Look for obvious debris like coins, hair ties, or small clothing items stuck in the folds. Remove anything you find.
Mix equal parts white vinegar and water in your spray bottle. Spray the entire interior surface of the gasket, working the solution into the folds and crevices. Vinegar kills mold and dissolves detergent buildup without damaging rubber.
Use your toothbrush to scrub the gasket folds where buildup is thickest. Pay special attention to the bottom area where water collects. You should see dark residue coming off onto your brush.
Locate the small drain holes at the bottom of the bellows, usually 2-4 holes about the size of a pencil lead. Insert your pipe cleaner or zip tie and gently push through any blockages. You should feel resistance if they are clogged.
Use your cloth to wipe the entire gasket dry. Get into all the folds and remove any remaining debris. Leave the door open for at least an hour to let everything air dry completely.
Run a short wash cycle with a small load and check for leaks. If the cleaning worked, you should see no water escaping during any cycle phase.
Make this cleaning routine a monthly habit. It takes five minutes and can add years to your door seal life while preventing leaks and mold odors.
Once you find damage to your door gasket, you need to decide whether to attempt a repair or go straight to replacement.
Small tears under one inch, especially if they are clean cuts rather than ragged rips, can sometimes be patched temporarily. This is useful if you need to wait for a replacement part or want to delay the expense.
A forum user reported success using Loctite CA 171 glue (cyanoacrylate adhesive) to bond a small tear in their Samsung washer gasket. They cleaned the area thoroughly, applied a thin layer of CA glue to both sides of the tear, pressed it together, and held it for 60 seconds. The repair held for three months while they waited for the replacement seal to arrive.
Silicone sealant is another temporary option for very small cracks. Apply a thin bead over the damaged area and let it cure completely before using the washer.
Warning: These are temporary fixes only. Do not rely on glued repairs long-term, as they can fail suddenly and cause water damage to your flooring.
Replace your door seal immediately if you find any of these conditions: multiple tears anywhere on the gasket, a tear larger than one inch, significant mold or mildew embedded in the rubber that cleaning cannot remove, rubber that is brittle or cracking throughout, or damage at the inner attachment point where the seal meets the drum.
Also replace the seal if you have tried cleaning and temporary repairs but leaks persist. The cost of a new gasket is far less than the cost of water damage repairs to your home.
With proper maintenance including monthly cleaning and keeping the door open between loads, a door seal should last 7-10 years. Heavy use, frequent hot water washing, and poor maintenance can reduce this to 3-5 years.
If your washer is over eight years old and developing door seal issues, consider whether a full machine replacement makes more sense than continued repairs.
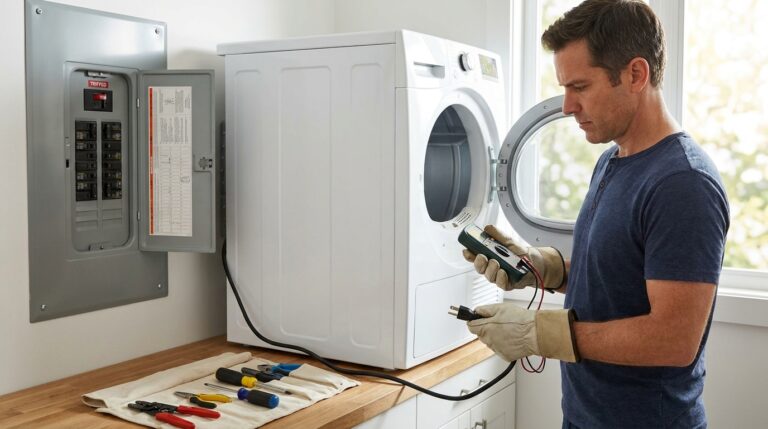
Replacing a door seal is a straightforward repair that most homeowners can complete in 45-60 minutes. You will save $150-300 in labor costs by doing it yourself.
You will need a replacement door seal (order by your exact model number), a Phillips screwdriver, a flat-head screwdriver, spring clamp pliers (strongly recommended for LG models), and a towel to catch any residual water.
Always unplug your washer before starting repairs. Open the door and locate the retaining wire on the outer edge of the seal. This is a spring-loaded wire that holds the gasket to the front panel.
Use your flat-head screwdriver to carefully pry the spring on the outer clamp away from the gasket. Work the wire out of its groove gradually, being careful not to damage the surrounding plastic. Once the outer clamp is free, peel the gasket away from the front panel.
Pull the seal inward to access the inner clamp that attaches to the drum. This clamp is usually tighter than the outer one. For LG models, this is where your spring clamp pliers become essential. Compress the spring and work the clamp off the groove.
Once both clamps are removed, pull the old seal completely away from the washer. Check the drum opening and front panel groove for any debris or buildup. Clean these areas thoroughly with a damp cloth.
Start by fitting the new seal onto the inner drum. The seal has a groove that fits over the drum lip. Work it into place evenly all the way around. This takes patience. Once seated, reinstall the inner clamp, making sure it sits in the groove completely.
Pull the seal outward and fit it over the front panel opening. Make sure it is seated evenly with no twists or folds. Reinstall the outer wire clamp, starting at the spring and working the wire into the groove around the perimeter.
Plug the washer back in and run a short cycle without laundry. Watch carefully during the fill and spin cycles for any leaks. Check that the door closes and latches properly with the new seal thickness.
Do not get discouraged if the installation takes longer than expected. The spring clamps are the trickiest part. Take breaks if you get frustrated and remember that thousands of homeowners complete this repair successfully every month.
Understanding your options helps you make the smartest financial decision for your situation.
The main expense for DIY door seal replacement is the part itself. Door seals range from $50-150 depending on your washer brand and model. Generic aftermarket seals cost less but may not fit as precisely as OEM parts. Shipping can add $10-20 if you need the part quickly.
Tools are a one-time investment. Spring clamp pliers cost $15-25, and if you do not already own basic screwdrivers, a set will run $10-20. Most homeowners already have these tools.
Total DIY cost: $50-200 depending on parts and tools needed. The savings are substantial if you have multiple appliances or plan to keep your washer for several more years.
Professional appliance technicians typically charge $100-150 for a service call and diagnosis. Labor for door seal replacement adds another $100-200 depending on your location and the complexity of your specific model.
The same $50-150 part cost applies, and some companies mark up parts by 25-50%. Total professional repair cost: $150-400.
DIY makes sense if you are comfortable with basic hand tools, your washer is worth repairing (under 10 years old), you have time to wait for parts, and you enjoy learning home repair skills. The repair is straightforward with no electrical work required.
Hire a technician if your washer is under warranty (DIY repairs may void it), you have physical limitations that make working on the floor difficult, you need same-day repair for an emergency, or you have tried DIY and the leak persists (indicating a more complex issue).
One forum member wisely noted that after three hours of struggling with a spring clamp, they wished they had paid the $200 service call from the start. Know your limits and value your time.
Sometimes you replace the seal, clean everything thoroughly, and water still escapes. Here is how to diagnose persistent leaks.
The most common post-repair leak cause is an improperly seated seal. Remove the front panel clamp and check that the gasket groove is fully engaged with the panel lip all the way around. Even a small gap causes leaks.
Also check that the inner clamp is properly seated on the drum. If the seal slips off the drum lip during installation, water will leak behind the gasket.
A new seal is thicker than a worn one. If your door latch was already loose or your door hinges were sagging, the new seal thickness might make alignment problems more obvious.
Check that the door closes with even pressure all around. Tighten hinge screws and adjust the latch if needed. Sometimes a new seal requires slight door adjustment to seal properly.
If you have replaced the seal and confirmed proper installation but still see water, the leak may be coming from elsewhere. Check the drain pump filter (often at the bottom front of the washer), the water inlet hoses at the back, the detergent dispenser drawer, or internal hoses.
Run a cycle and use a flashlight to trace the exact path of water. Door leaks drip from the door area. Other leaks follow different patterns.
If your washer is less than a year old and has door seal issues, contact the manufacturer. This should be covered under warranty. For washers 1-5 years old, some manufacturers cover door seals under extended parts warranties even if labor is not included.
Persistent leaks after proper DIY repair may indicate a cracked drum, damaged door glass, or other issues requiring professional diagnosis.
The best way to deal with door leaks is to prevent them from happening in the first place. A five-minute monthly routine can add years to your door seal life.
Once a month, spray the door seal with white vinegar and wipe it dry. Pull back the folds and remove any lint or debris. Check the drain holes and clear any blockages with a pipe cleaner. This prevents mold buildup and debris accumulation that cause leaks.
The number one cause of door seal tears is foreign objects left in pockets. Coins, keys, pens, and small toys get caught between the door and seal, cutting the rubber as the drum spins. Make checking pockets a household rule.
Mold and mildew grow in dark, damp environments. Leaving your washer door slightly open when not in use allows air circulation that dries the seal completely. This simple habit prevents the mold buildup that causes seal degradation and leaks.
Always use HE detergent in front load washers. Regular detergent creates excessive suds that stress the door seal. Use only the minimum amount needed for your load size. More detergent does not mean cleaner clothes, but it does mean more potential leaks.
Once a year, take five minutes to inspect your entire washer. Check the door seal for small tears or cracks before they become big leaks. Tighten any loose door hinge screws. Verify the washer is level and adjust feet if needed. Look for calcium buildup around the seal that might indicate hard water damage.
These simple maintenance steps take minimal time but save significant repair costs and extend your washer life by years.
Yes, replacing a door seal is usually worth it if your washer is under 10 years old and otherwise working well. A new seal costs $50-150 and can add several years to your washer’s life. Compare this to $800-1500 for a new front load washer. However, if your machine has multiple issues or is over 10 years old, replacement may make more financial sense.
First, try cleaning the seal thoroughly with vinegar to remove mold and debris. Check for and clear clogged drain holes at the bottom of the gasket. If the seal is torn, small tears under one inch can be temporarily patched with CA glue or silicone sealant. For larger damage, replace the entire seal by removing the old one, cleaning the groove, installing the new seal on the inner drum first, then the outer panel, and reinstalling the wire clamps.
Front leaks typically come from the door seal (gasket), which may be dirty, torn, or compromised. Other causes include oversudsing from too much or wrong detergent, a misaligned door from loose hinges, a door latch not securing properly, or clogged drain holes in the seal causing water backup. Run a cycle and watch during the spin phase to confirm the door is the actual leak source.
DIY replacement costs $50-200 total, including $50-150 for the seal part and $15-25 for spring clamp pliers if needed. Professional repair costs $150-400, including $100-150 service call fee, $100-200 labor, and marked-up parts. DIY saves $150-300 but requires 45-60 minutes of work.
Small tears under one inch can be temporarily repaired with CA glue (super glue) or silicone sealant as an emergency fix while waiting for replacement parts. However, these are temporary solutions only. Larger tears, multiple damage areas, or brittle rubber require full seal replacement for safe, long-term operation. Do not rely on glued repairs for more than a few weeks.
DIY repair costs $50-200 depending on the seal part cost and whether you need to buy tools. Professional appliance repair costs $150-400 including diagnosis, labor, and parts. LG and Samsung seals tend to be more expensive ($80-150) while Whirlpool and GE seals are often cheaper ($50-100).
Leaks that only occur with full loads often indicate a door alignment issue or a small tear in the lower portion of the seal. The weight of a full load puts different pressure on the door, and the high water level during large loads can expose small gaps in the seal that empty or small loads do not trigger. Check for door sag and inspect the bottom of the seal carefully.
With proper maintenance including monthly cleaning and leaving the door open between loads, a door seal typically lasts 7-10 years. Heavy use, frequent hot water washing, poor maintenance, or consistently overloading the washer can reduce lifespan to 3-5 years. Regular cleaning and proper detergent use are the best ways to maximize seal life.
A washer leaking from the door is frustrating, but it is rarely a reason to panic or replace your entire machine. In most cases, the solution is as simple as cleaning accumulated mold from the gasket or tightening a loose door latch. When the seal itself is damaged, DIY replacement is an accessible repair that saves hundreds of dollars compared to professional service.
The key is proper diagnosis. Take time to confirm the leak is actually from the door, identify whether cleaning or replacement is needed, and gather the right tools before starting. For most homeowners, a leaking door seal represents a weekend project that restores their washer to perfect working order.
Remember that prevention is always easier than repair. A five-minute monthly cleaning routine, checking pockets before washing, and leaving your door open between loads will keep your front load washer sealing properly for years to come. Your future self will thank you when you are not stepping into puddles on laundry day.