Physical Address
304 North Cardinal St.
Dorchester Center, MA 02124
Physical Address
304 North Cardinal St.
Dorchester Center, MA 02124

If you’re dealing with inconsistent hot water, scalding showers, or a water heater that’s not heating properly, learning how to test water heater thermostat functionality could save you hundreds of dollars in unnecessary service calls. I’ve diagnosed countless water heater issues over the years, and thermostat problems rank among the most common culprits behind hot water failures. Testing your thermostat is a straightforward DIY task that anyone can tackle with the right tools and safety precautions.
In this comprehensive guide, I’ll walk you through everything you need to know about how water heaters work and how to accurately diagnose thermostat issues using a multimeter. Whether you’re experiencing no hot water, lukewarm temperatures, or that frustrating problem where you only get 5 minutes of hot water before it runs cold, understanding how to test your water heater thermostat will help you pinpoint the problem and decide whether it’s a simple fix or time to call in a professional.
A water heater thermostat is essentially the brain of your heating system. This temperature-sensing device monitors the water temperature inside your tank and controls when the heating elements turn on and off to maintain your desired water temperature. When water temperature drops below your set point, the thermostat signals the heating elements to activate. Once the target temperature is reached, it shuts them off to prevent overheating and energy waste.
Electric water heaters typically feature two thermostats—an upper and a lower unit—each controlling its own heating element. The upper thermostat acts as the master control, directing power flow between the two elements. Only one heating element operates at a time, which is why understanding the difference between upper and lower thermostat function is crucial for accurate diagnosis. If you’re deciding between gas vs electric water heaters, note that gas models use a different type of thermostat system with a gas control valve rather than separate electrical thermostats.
A properly functioning thermostat maintains consistent water temperatures around 120°F, which is hot enough for household use while preventing scalding risks. When thermostats fail, they can cause your water heater to run continuously, driving up water heating energy costs, or prevent heating entirely, leaving you with cold showers. Understanding how these components work is the first step toward effective troubleshooting.
Before you grab your multimeter, it’s important to confirm that your symptoms actually point to a thermostat problem. Based on my experience diagnosing water heater issues, these are the most reliable indicators that your thermostat may be failing:
No Hot Water: If you’re getting zero hot water from any tap, your upper thermostat has likely failed completely. The upper thermostat controls power to both heating elements, so when it goes bad, the entire system stops working. Before assuming the worst, check that your circuit breaker hasn’t tripped and that the water heater is actually receiving power.
Lukewarm Water: Water that’s warm but never reaches proper temperature usually indicates a failing lower thermostat or a heating element issue. Since the lower thermostat only controls the bottom element, you’ll get some heating from the upper element but not enough to fully heat the tank. This is one of the most common complaints I hear from homeowners.
Short Hot Water Supply: If you only get 5-10 minutes of hot water before it runs cold, your lower thermostat or element is likely malfunctioning. The upper thermostat heats the top portion of the tank first, which explains why you get some hot water initially. Once that limited supply is used, the lower portion hasn’t been adequately heated, resulting in cold water. This is the classic “water heater only hot for 5 minutes” problem that plagues many households.
Scalding Water: Water that’s dangerously hot can indicate a thermostat that’s stuck in the “on” position, failing to shut off the heating elements when the proper temperature is reached. This is not only uncomfortable but poses a serious safety risk, especially for children and elderly family members. If your temperature relief valve is releasing water periodically, this could also indicate a thermostat failure.
Inconsistent Temperatures: Water that fluctuates between hot and cold during use suggests a thermostat that’s intermittently failing or making poor contact. This symptom often worsens over time as the thermostat’s internal components degrade. Forum discussions consistently highlight this as one of the most frustrating thermostat-related issues homeowners face.
Higher Energy Bills: A failing thermostat can cause your water heater to run continuously or cycle too frequently, significantly increasing energy consumption. If your electric bills have spiked unexpectedly and you’ve ruled out other causes, a malfunctioning thermostat might be the culprit.
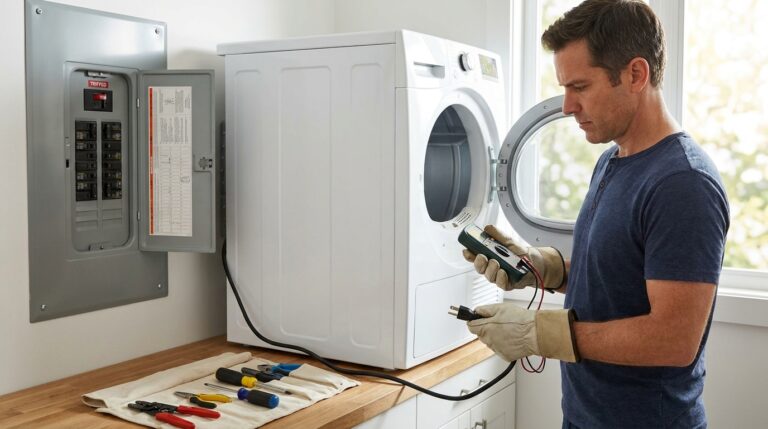
Gather these tools before you begin testing. Having everything ready will make the process smoother and safer:
Testing your water heater thermostat involves working with electrical components, so safety must be your top priority. I’ve seen too many homeowners skip these steps and risk serious injury. Follow these precautions without exception:
Turn Off Power at the Breaker Panel: This is non-negotiable. Locate your electrical panel and find the dedicated circuit breaker for your water heater. Flip it to the “off” position. I recommend taping over the breaker or placing a sign warning others not to turn it on while you’re working. If you’re unsure which breaker controls the water heater, turn off the main power to your entire house—better safe than sorry.
Verify Power Is Off: Use your non-contact voltage tester on the wires going to the water heater to confirm there’s no power. If you don’t have a voltage tester, turn on a hot water faucet to run any remaining hot water out of the tank—this reduces the risk of scalding if you accidentally touch hot components.
Allow Water Heater to Cool: If your water heater was recently running, the components inside can be extremely hot. Give it at least 30 minutes to cool down before opening access panels. I’ve learned this lesson the hard way—burnt fingers are no fun.
Never Test With Power On: Continuity testing must be performed with the power completely off. Testing a thermostat with power applied can damage your multimeter and create a serious shock hazard. Some sources discuss “testing water heater thermostat with power on” using voltage measurements, but this requires advanced electrical knowledge and is not recommended for DIYers.
Know Your Limits: If you’re uncomfortable working with electricity or your diagnosis reveals complex wiring issues beyond simple thermostat testing, there’s no shame in calling a professional. The cost of a service call is far less than the cost of an emergency room visit.
Now that you’re prepared and working safely, let’s walk through the complete testing procedure. I’ll guide you through testing both the upper and lower thermostats, explaining what to look for at each step.
Remove the access panels on the side of your water heater using your screwdriver. Most electric water heaters have two panels—one upper and one lower. Behind each panel, you’ll find a layer of insulation. Carefully push this aside to access the thermostat and heating element. You’ll also see a plastic safety cover protecting the thermostat and wiring—remove this by unscrewing it or gently prying it loose, depending on your model.
Take a moment to familiarize yourself with what you’re seeing. The thermostat is the rectangular component with temperature markings and a small dial or slider. The heating element is the metal U-shaped tube extending into the tank. You’ll also see several wires connected to the thermostat—these deliver power to the components. Notice the red reset button on the thermostat; if it’s popped out, the thermostat has tripped due to overheating. This is often confused with a failed thermostat when it’s actually a safety feature doing its job.
Set your multimeter to measure continuity (usually indicated by a continuity symbol or speaker icon) or resistance (ohms). If your multimeter has an audible continuity feature, enable it—you’ll hear a beep when there’s a complete circuit. Touch one probe to the common terminal (usually marked “COM” or “1”) and the other probe to the left terminal (marked “L” or “2”).
Expected Reading: You should get a continuity reading (near zero ohms or an audible beep) if the thermostat is calling for heat. If you get no continuity, the thermostat is defective and needs replacement. Next, test between the common terminal and the right terminal (marked “R” or “4”). This should show no continuity when the thermostat is set to its normal operating temperature.
The high-limit switch is a safety feature that shuts off power if water temperature exceeds safe limits. Test it by checking continuity between the two limit switch terminals. If you have no continuity, the high-limit has tripped or failed. Try pressing the red reset button firmly—if you hear a click and continuity is restored, the thermostat was simply tripped. If the button won’t stay reset or there’s still no continuity, the thermostat needs replacement.
Move to the lower access panel and repeat the testing process. The lower thermostat wiring is simpler than the upper, with typically three terminals. Test between terminal 1 and terminal 2, then between terminal 2 and terminal 3. You should have continuity on one pair and not the other, depending on the thermostat’s position. If both tests show continuity or neither shows continuity, the lower thermostat is faulty.
While you’re testing, it’s wise to check the heating elements as well. A faulty element can mimic thermostat symptoms. Disconnect one wire from the element and test continuity across the two element terminals. A good element will show continuity (typically 10-16 ohms for residential water heaters). If you get no continuity, the element is burned out and needs replacement. Test both the upper and lower elements while you have the panels open.
Write down which tests passed and which failed. This documentation is valuable for troubleshooting and essential if you decide to call a professional. It also helps when purchasing replacement parts—you’ll know exactly which components need replacing.
If both thermostats pass the continuity tests and the heating elements show proper resistance, your thermostat system is likely functioning correctly. The problem may lie elsewhere—perhaps a sediment buildup issue, a broken dip tube, or even undersized unit for your household’s needs. However, if any component fails its continuity test, that part needs replacement before your water heater will function properly again.
Now that you’ve completed your tests, let’s interpret what your results mean and how to address specific issues. Based on forum discussions and real-world troubleshooting, these are the scenarios you’re most likely to encounter:
If your upper thermostat failed the continuity test, you’ll experience no hot water at any tap. This is because the upper thermostat controls power flow to the entire system. Before replacing the thermostat, verify the high-limit switch hasn’t simply tripped. Press the reset button firmly and restore power. If the thermostat trips again quickly, you may have a grounded element or a genuine thermostat failure requiring replacement.
A failed lower thermostat typically results in that frustrating scenario where you only get 5-10 minutes of hot water. The upper element heats the top portion of the tank, providing limited hot water, but the lower portion never reaches proper temperature. Replacing the lower thermostat usually resolves this issue completely.
If both thermostats pass continuity testing but you’re still experiencing hot water problems, the issue likely lies with your heating elements. Recheck your element tests—if either shows no continuity, replacement is necessary. Heating elements are relatively inexpensive and straightforward to replace for DIYers with basic electrical knowledge.
If your thermostat’s reset button trips repeatedly, this indicates the high-limit switch is activating due to excessive temperature. Common causes include a malfunctioning thermostat that fails to shut off at the proper temperature, a grounded heating element that stays on continuously, or excessive sediment buildup causing hot spots. If replacing the thermostat doesn’t solve the problem, consider checking your elements or having a professional evaluate the system.
While a multimeter is the most accurate testing tool, you can perform some basic diagnostics without one. The power-on method involves carefully feeling the tank temperature after the water heater has been running for 30 minutes. If the upper portion of the tank is hot but the lower portion remains cold, your lower thermostat or element may be faulty. However, this method is imprecise and carries more risk than continuity testing with power off. I strongly recommend investing in a basic multimeter rather than relying on alternative testing methods.
Thermostats are relatively inexpensive components (typically $20-40) and are generally replaced rather than repaired. The cost of professional replacement runs $150-250 including parts, while DIY replacement costs only the price of the part. However, if your water heater is approaching 10-12 years old and you’re experiencing multiple component failures, it may be more cost-effective to replace the entire unit rather than continuing to repair individual components.
Sometimes thermostats test good functionally but don’t maintain accurate temperatures. If your water is consistently too hot or too cold despite proper thermostat operation, the thermostat may have lost its calibration. Some thermostats have adjustable calibration screws, but on most residential models, replacement is the only solution. If you’re concerned about accuracy, consider installing an external thermometer on the hot water outlet pipe to monitor actual temperature.
A properly functioning thermostat is essential for energy efficiency. When thermostats malfunction, they can cause elements to run continuously or cycle excessively, both of which waste energy. If your electric bills have increased noticeably and you’ve confirmed a thermostat problem, replacing the faulty component often pays for itself in energy savings within 6-12 months. Setting your thermostat to 120°F rather than higher temperatures also improves efficiency while still providing comfortable hot water for most household needs.
To check if your water heater thermostat is bad, first turn off power at the breaker panel. Remove the access panels and test the thermostat with a multimeter set to measure continuity. Touch the probes to the thermostat terminals—you should get continuity (near zero ohms or an audible beep) when testing a functioning thermostat. No continuity indicates a failed thermostat that needs replacement. Also check if the red reset button has tripped, as this can indicate thermostat problems or overheating issues.
Set your multimeter to measure continuity (often indicated by a speaker icon) or resistance (ohms). For continuity testing with an audible alert feature enabled, touch one probe to the common terminal and another to one of the other terminals. A working thermostat will show continuity when calling for heat. For resistance testing, place probes on the thermostat terminals—a reading of zero or near-zero ohms indicates continuity, while infinite resistance (no reading) means the thermostat has failed. Always test with power completely off for safety.
Getting only 5 minutes of hot water typically indicates a faulty lower thermostat or lower heating element. The upper thermostat and element heat only the top portion of the tank, providing limited hot water before the colder lower water mixes in. Test the lower thermostat for continuity and check the lower heating element. If either fails its test, replacement will restore full hot water capacity. This is one of the most common water heater complaints and is usually a straightforward fix.
With power turned off at the breaker, access the thermostat by removing the water heater’s access panel and insulation. Set your multimeter to continuity mode and touch one probe to the common terminal (usually marked COM) and the other probe to one of the other terminals. A good thermostat will show continuity when it should be calling for heat. Test all terminal combinations according to your thermostat’s wiring diagram. No continuity where there should be continuity indicates a failed thermostat. For definitive diagnosis, compare your readings against the manufacturer’s specifications for your specific thermostat model.
While a multimeter is the recommended tool for accurate testing, you can perform basic diagnostics without one. The power-on method involves running the water heater for 30 minutes then carefully feeling the tank temperature—if the top is hot but the bottom is cold, your lower thermostat or element may be faulty. You can also check if the reset button has tripped. However, these methods are imprecise and carry more risk than proper continuity testing. A basic digital multimeter costs $15-30 and provides accurate, safe testing that definitively identifies faulty components.
A repeatedly tripping reset button indicates the high-limit switch is activating due to excessive temperature. First, verify the thermostat isn’t set too high—120°F is recommended. Check if either heating element has shorted out by testing continuity from each element terminal to ground—any reading indicates a grounded element requiring replacement. Excessive sediment buildup can also cause hot spots that trigger the reset. If replacing the thermostat and elements doesn’t solve the problem, consult a professional as there may be a more serious wiring or control issue.
Upper thermostat failure typically results in no hot water anywhere in the house because it controls power to both heating elements. Lower thermostat failure usually provides limited hot water (5-10 minutes) since the upper element still works but can’t heat the entire tank alone. Test each thermostat separately with your multimeter—if the upper thermostat shows no continuity, replace it first. If the upper tests good but the lower shows no continuity, the lower thermostat is the problem. Both can be tested in about 15 minutes once you have access to the components.
Learning how to test water heater thermostat components is a valuable DIY skill that can save you time, money, and frustration when hot water problems arise. By following the safety precautions and testing procedures outlined in this guide, you can accurately diagnose thermostat issues and make informed decisions about repair versus replacement. Remember that thermostat testing is just one part of water heater maintenance—regular flushing to remove sediment, checking the anode rod, and monitoring for leaks all contribute to extending your water heater’s lifespan.
If your testing reveals a faulty thermostat and you’re comfortable with basic electrical work, replacement is a straightforward DIY project that typically takes less than an hour. However, there’s no shame in calling a professional if you’re unsure about any aspect of the diagnosis or repair. The most important thing is addressing the problem promptly to restore your hot water supply and prevent further damage to your water heater system.
For homeowners considering whether to repair or replace, water heaters typically last 10-12 years. If your unit is approaching this age and experiencing multiple component failures, exploring the best water heaters on the market might be more cost-effective than continuing repairs. Either way, understanding how to test your water heater thermostat gives you the knowledge to make informed decisions and keep your hot water flowing reliably for years to come.