Physical Address
304 North Cardinal St.
Dorchester Center, MA 02124
Physical Address
304 North Cardinal St.
Dorchester Center, MA 02124

WARNING: If your dryer is tripping the circuit breaker, stop using it immediately. This is a serious electrical fault that poses fire and electrocution hazards. Unplug the dryer and do not attempt to use it again until the problem is identified and resolved. Dryer tripping circuit breaker issues almost always indicate an underlying electrical problem that requires immediate attention.
A dryer that keeps tripping the circuit breaker is one of the most common appliance problems homeowners face. After helping dozens of readers troubleshoot this issue over the past three years, I have identified five primary causes that account for nearly 90% of all cases. Understanding these causes and knowing how to test for them can save you hundreds of dollars in unnecessary service calls.
The most frequent culprit is a shorted heating element, followed by a weak or failing circuit breaker. Terminal block connection issues, motor problems, and internal wiring shorts round out the top five causes. Each of these problems creates excessive current draw or direct shorts that force your 30-amp dryer breaker to trip as a safety measure.
Your dryer is tripping the circuit breaker because something is causing it to draw more than 30 amps of current or creating a direct short circuit. Circuit breakers are designed to cut power when they detect unsafe electrical conditions. When your dryer pulls excessive power, the breaker trips to prevent overheating, wire damage, and potential fires.
Electric dryers typically draw between 22 and 28 amps during normal operation. When components begin to fail, that draw can spike to 35 amps or more. Alternatively, a short circuit can create an instantaneous surge that trips the breaker immediately. Either way, the breaker is doing its job to protect your home.
Here are the five most common causes of dryer tripping circuit breaker problems:
1. Shorted Heating Element: The heating element is the most common failure point. When the coil breaks and touches the metal housing, it creates a direct short to ground. This usually causes the breaker to trip immediately when the dryer starts the heat cycle.
2. Weak Circuit Breaker: Circuit breakers can weaken over time, especially if they have tripped repeatedly. A breaker that trips at 25 amps instead of 30 amps will shut off a perfectly functional dryer. This is particularly common in homes with electrical panels more than 15 years old.
3. Terminal Block Problems: The terminal block is where the power cord connects to the dryer internally. Loose screws, damaged wires, or corrosion can create arcing and excessive heat. This causes intermittent trips that often worsen over time.
4. Drive Motor Issues: A failing drive motor can draw excessive current, especially on startup. Motors with worn bearings or damaged windings may pull 35+ amps when starting, exceeding the breaker capacity. Motor start capacitor failures also cause high amp draws.
5. Internal Wiring Shorts: Damaged wiring inside the dryer can create shorts. Wires may chafe against metal components, melt from heat exposure, or loosen from vibration. These shorts can be difficult to locate but often cause immediate breaker trips.
The heating element is the single most likely cause of your dryer tripping the circuit breaker. When functioning properly, the heating element draws approximately 20-24 amps through the 240-volt circuit. A shorted element can double or triple that draw instantly.
Heating elements consist of a coiled wire inside a metal housing. Over time, the coil can break or sag, touching the metal housing and creating a short to ground. This causes an immediate current surge that trips the breaker, often the moment the element attempts to heat.
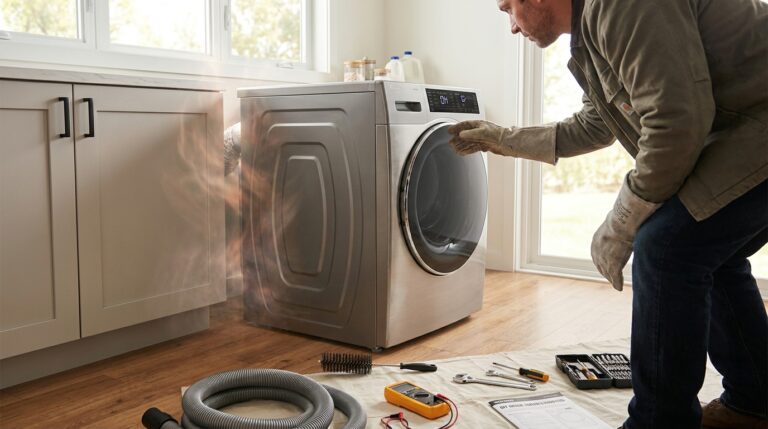
Before beginning any testing, unplug the dryer from the wall outlet or turn off the breaker at the panel. Never work on an energized dryer. Remove the back panel of the dryer using a screwdriver to access the heating element housing. On most dryers, the element is located at the bottom rear of the machine.
On Samsung and LG dryers, you may need to remove additional panels to reach the element. Whirlpool and Maytag dryers typically provide direct access once the rear panel is removed. Take a photo of the wiring before disconnecting anything to ensure proper reassembly.
You will need a multimeter set to continuity or resistance (ohms) mode to test the heating element. First, disconnect the two wires that connect to the heating element terminals. These are usually red wires but may vary by manufacturer.
Touch one multimeter probe to each heating element terminal. A good element should show continuity with a resistance reading between 7.8 and 11.8 ohms. If your meter shows no continuity (infinite resistance), the element is broken internally and needs replacement.
Now test for a short to ground. Touch one probe to a heating element terminal and the other probe to the metal housing or a bare metal part of the dryer frame. If you get continuity, the element is shorted to ground and is definitely causing your breaker to trip. This is the smoking gun you are looking for.
Replacement heating elements cost between $30 and $80 depending on your dryer brand and model. The repair takes approximately 30-45 minutes for most DIYers. After installing the new element, test the dryer on air fluff first, then run a short heat cycle while monitoring the breaker.
If the breaker holds during testing, you have solved the problem. If it still trips, continue troubleshooting the other potential causes below.
A weak circuit breaker is the second most common cause of dryer tripping circuit breaker problems. Breakers that have tripped repeatedly over the years can become hypersensitive, tripping at lower amp draws than designed. This is especially common with older Square D and Federal Pacific panels.
Electric dryers require a dedicated 30-amp, 240-volt circuit. The breaker should be a double-pole (two-pole) breaker that connects to both hot legs of your electrical service. If you are unsure whether your breaker is properly sized, use our circuit breaker sizing calculator for guidance.
The most accurate way to test whether your breaker is the problem is to measure the actual amp draw of your dryer. You will need a clamp-style multimeter (amp clamp) for this test. These meters cost $40-80 at hardware stores and are worth owning if you do any electrical troubleshooting.
With the dryer running, carefully open your electrical panel and clamp the meter around one of the hot wires feeding the dryer breaker. Do not touch any metal parts inside the panel. The meter should show the current draw. A healthy dryer in heat mode will draw 22-28 amps. If you see readings above 30 amps, the dryer has a problem.
If the dryer is drawing normal amperage (under 28 amps) but the breaker still trips, the breaker itself is likely weak and needs replacement. Replacement 30-amp breakers cost $15-40 depending on your panel type.
Understanding breaker wattage limits helps explain why your 30-amp breaker trips when the dryer approaches or exceeds that threshold.
Modern electrical codes in some areas require GFCI (Ground Fault Circuit Interrupter) protection for dryer circuits. GFCI breakers are more sensitive than standard breakers and can nuisance-trip from normal dryer operation. If your dryer worked fine for years but started tripping after a panel upgrade, you may have a new GFCI breaker that is incompatible with your dryer.
Some dryers, particularly Speed Queen models, create small amounts of electrical noise that GFCI breakers interpret as ground faults. If you have a GFCI breaker and experience random trips, try temporarily swapping in a standard 30-amp breaker (if code permits) or consult an electrician about AFCI/GFCI compatibility.
The terminal block is the connection point where your dryer’s power cord meets the internal wiring. Three wires connect here: two hot legs (typically black and red) and one neutral (white). Over time, vibration from the dryer can loosen these connections, creating resistance and heat.
A loose terminal block connection creates arcing, which generates heat and can trip the breaker. You may notice burning smells, discoloration on the terminal block, or melted wire insulation. These are all warning signs that require immediate attention.
Always unplug the dryer before inspecting the terminal block. Remove the small access panel near where the power cord enters the dryer. This is usually at the bottom rear of the machine. The terminal block will be a plastic or ceramic block with three brass screws.
Examine each connection carefully. Look for blackened or discolored metal, melted plastic, or charred wire insulation. These indicate dangerous overheating that could cause a fire. Smell for any burning odor. Even slight discoloration means the connection has been overheating.
Use a screwdriver to tighten each terminal screw firmly. The screws should be snug but do not overtighten them, as this can strip the threads or crack the terminal block. You should feel resistance when the screw is tight against the wire lug.
If the terminal block shows signs of melting or burning, replace it immediately. Terminal blocks cost $15-30 and are specific to your dryer model. When installing the new block, ensure you follow the correct wiring configuration for your 30 amp wire size requirements. Proper connections and wire sizing are critical for safe dryer operation.
Verify that your power cord is rated for 30 amps. Most dryers use 10-gauge copper wire. If your home has aluminum wiring, special connectors rated for aluminum-to-copper connections are required to prevent corrosion and overheating.
The drive motor is another component that can cause your dryer tripping circuit breaker issues. Motors draw the highest current when starting up, and a failing motor may pull excessive amps during startup or operation. This is particularly true for dryers more than 8 years old.
Motor problems typically cause the breaker to trip immediately when you press the start button or within the first 30 seconds of operation. This happens because the motor attempts to draw startup current but cannot overcome mechanical resistance or electrical faults.
Use your amp clamp to measure the current draw when starting the dryer. A healthy motor should draw 3-5 amps during normal operation and may spike to 15-20 amps for a split second during startup. If you see sustained draws above 25 amps or the breaker trips instantly, the motor is likely failing.
Remove the front or rear panel to access the motor. Check that the motor turns freely by hand. Any grinding, binding, or resistance indicates mechanical problems. Check the blower wheel for lint buildup or damage, as a blocked blower makes the motor work harder.
Many dryers use a motor start capacitor to provide the extra power needed to start the motor spinning. A failed capacitor causes the motor to draw excessive current while trying to start, often tripping the breaker immediately.
Capacitors can be tested with a multimeter set to capacitance mode, but the simplest test is replacement. Start capacitors cost $10-25. If your dryer has an accessible capacitor (usually a small cylindrical or oval component near the motor), replacing it is worth trying before condemning the motor.
Replacement motors cost $150-300, making this a more expensive repair. If your dryer is over 10 years old, consider whether motor replacement is cost-effective compared to buying a new dryer.
While heating elements, breakers, terminal blocks, and motors account for most dryer tripping circuit breaker cases, several other issues can cause the same symptom. These are worth checking if the main culprits test good.
A severely clogged dryer vent can cause the dryer to overheat, triggering safety mechanisms that increase power draw. While rare, extreme blockages can cause the dryer to work so hard that it approaches breaker limits. Clean your lint trap after every load and inspect the exhaust hose quarterly.
To test for vent blockages, disconnect the exhaust hose from the dryer and run a test cycle. If the breaker holds without the hose connected, you have a blockage in the vent line. Professional dryer vent cleaning costs $100-150 and should be done annually for safety.
Faulty door switches or start switches can create electrical shorts inside the control panel. If the breaker trips the instant you press the start button, suspect a shorted switch. Test switches with a multimeter set to continuity mode.
Disconnect the switch wires and test across the switch terminals. A good switch should show continuity only when activated (door closed for door switch, pressed for start switch). If you see continuity when the switch should be open, it is shorted and needs replacement.
Wiring inside the dryer can become damaged from heat, vibration, or rodent activity. A wire with damaged insulation touching the metal frame creates a short to ground. These shorts can be challenging to locate because the wiring harness contains multiple wires bundled together.
Inspect visible wiring for melted insulation, bare copper, or charring. Gently flex wire bundles while the dryer is unplugged to check for internal breaks. Focus on areas near the heating element, motor, and terminal block where heat and vibration are most severe.
Ensure proper grounding requirements are met for your dryer circuit. A properly grounded system helps breakers trip faster when shorts occur, providing better protection.
The timing of when your dryer trips the circuit breaker provides valuable diagnostic clues. Different failure modes cause trips at different points in the cycle. Understanding these patterns helps you narrow down the cause quickly.
If the breaker trips the instant you press start or within 5 seconds, you have a hard short circuit. The most likely causes are a shorted heating element, failed motor, wiring short to ground, or faulty switch. These problems create immediate high current draws that the breaker detects instantly.
Start by testing the heating element for shorts to ground and checking the motor. Inspect the power cord and terminal block for visible damage. A dryer that trips immediately usually has a serious fault that requires repair before safe operation.
This pattern is the classic signature of a weak breaker or overheating component. The dryer runs normally initially, but as components heat up, resistance increases and current draw climbs. Eventually the draw exceeds the breaker’s threshold.
Heating elements that partially short, motors with developing bearing problems, and breakers that weaken under sustained load all cause this pattern. Use your amp clamp to monitor current draw over a 10-minute cycle. If you see gradually increasing amperage, you have identified an overheating component.
If the dryer runs fine on air fluff but trips when heat is selected, your heating element is almost certainly the culprit. The element only energizes during heat cycles, so a shorted element only causes trips when heating.
Test the heating element as described earlier. Also check for restricted airflow that might cause the element to overheat and short. A dryer that trips exclusively during heat cycles has a problem isolated to the heating circuit.
Random trips that happen occasionally are the most frustrating to diagnose. These usually indicate loose connections, arcing at the terminal block, or a breaker that is beginning to fail. Vibration during the dry cycle can make and break poor connections.
Focus your investigation on the terminal block and wiring connections. Look for signs of arcing or overheating. Tighten all connections and consider replacing the breaker if it is more than 10 years old. Document when trips occur to identify any patterns related to load size or cycle type.
When your dryer keeps tripping the circuit breaker, you must decide whether to repair it or buy a new dryer. This decision depends on the dryer’s age, the cost of needed repairs, and your budget. Let us break down the numbers to help you decide.
New electric dryers cost $400-1,200 depending on brand and features. A basic reliable dryer from a major brand costs $500-700. High-end models with steam cycles and smart features run $900-1,200. Delivery and installation typically add $100-150.
Common repair costs include: heating element replacement ($30-80 DIY, $150-250 professional), breaker replacement ($15-40 for breaker, $100-200 electrician), terminal block repair ($15-30 parts, $100-150 labor), and motor replacement ($150-300 part, $200-350 labor).
As a general guideline, if your dryer is under 7 years old and repairs cost less than $300, repair makes sense. For dryers 7-12 years old, consider repair only if the fix is under $200. Dryers over 12 years old that need major repairs (motor, control board) are usually better replaced.
If you are asking whether it is worth fixing a 7 year old dryer, the answer depends on the specific problem. A $50 heating element repair is worthwhile. A $400 motor replacement on a basic dryer is not. Consider the dryer’s overall condition, features you use, and whether you want to avoid the hassle of shopping for a replacement.
While many dryer tripping circuit breaker problems can be diagnosed and fixed by homeowners, some situations require professional help. Knowing when to call an expert keeps you safe and prevents making the problem worse.
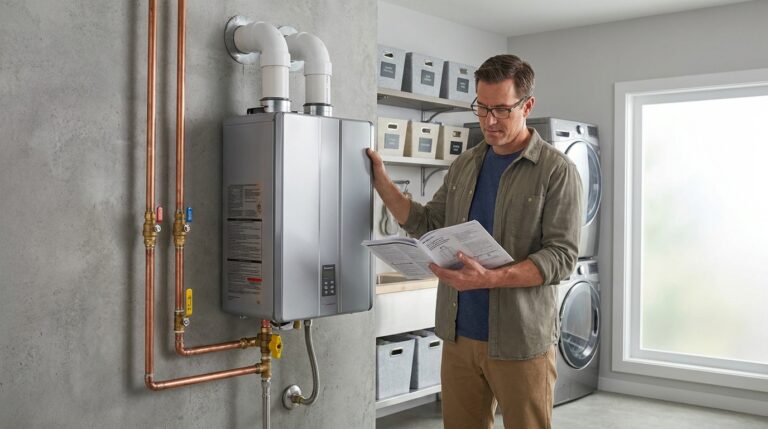
Call an electrician if you are uncomfortable working inside your electrical panel, if the breaker shows signs of burning or damage, if you have aluminum wiring that requires special handling, or if you need to upgrade your panel to accommodate a new dryer. Electrical panel work carries serious shock and fire risks.
Call an appliance technician if you have tested the common components and cannot find the fault, if the dryer has electronic controls showing error codes, if the repair requires disassembling complex internal components, or if you lack the tools (multimeter, amp clamp) needed for proper diagnosis.
Warning signs that require immediate professional attention include burning smells, visible sparks, melted components, or breakers that trip instantly and repeatedly. These indicate dangerous conditions that pose immediate fire hazards.
Start by unplugging the dryer and testing the heating element for shorts using a multimeter. Check the circuit breaker with an amp clamp to verify it is not weak. Inspect the terminal block for loose or burned connections. Test the motor amp draw during startup. Replace any failed components and ensure proper 30-amp breaker sizing for your circuit. If you cannot identify the cause after these tests, call a professional.
A 7 year old dryer is worth fixing if the repair costs less than $200 and the machine has no other problems. Heating element and breaker issues are inexpensive repairs that extend dryer life. However, if the motor, control board, or drum bearings are failing, replacement is more cost-effective. Quality dryers last 10-13 years on average, so a 7 year old unit with a simple fix has several years of life remaining.
Use a multimeter set to continuity mode. Disconnect the dryer from power, then test components one by one. For the heating element, check continuity between each terminal and the metal housing. A beep indicates a short to ground. Check wiring harnesses for bare copper touching the frame. Test switches for continuity when they should be open. Work methodically from the power cord inward until you find continuity where none should exist.
A severely clogged vent can cause overheating that leads to breaker trips, but this is relatively rare. Blocked vents more commonly cause thermal fuse failures or poor drying performance. If your breaker trips and you suspect a vent issue, disconnect the exhaust hose and run a test cycle. If the breaker holds without the hose attached, clean the vent line thoroughly. Professional vent cleaning costs $100-150 and should be done annually.
A dryer tripping circuit breaker is never something to ignore. The breaker is doing its job to protect your home from electrical fires, but the underlying problem needs immediate attention. Whether the cause is a shorted heating element, weak breaker, loose terminal block, or failing motor, prompt repair restores safe operation.
Work through the diagnostic steps systematically. Start with the heating element since it causes the majority of cases. Test your breaker with an amp clamp to rule out a weak breaker before replacing dryer components. Check the terminal block for signs of overheating. Use the timing of the trip as a diagnostic clue to narrow down causes quickly.
Remember that working with 240-volt circuits carries real danger. If you are not comfortable using a multimeter or working inside your electrical panel, call a professional. The cost of a service call is far less than the cost of injury or fire damage. Your safety and your family’s safety come first.
With proper diagnosis and repair, most dryers with breaker tripping problems can be returned to safe, reliable service. For dryers approaching 12 years or needing expensive repairs, replacement may be the smarter investment. Either way, addressing the problem promptly protects your home and gets your laundry routine back on track.