Physical Address
304 North Cardinal St.
Dorchester Center, MA 02124
Physical Address
304 North Cardinal St.
Dorchester Center, MA 02124

Nothing disrupts your kitchen routine quite like a freezer drawer that refuses to budge. You reach for ice cream or frozen vegetables, grip the handle, pull, and nothing happens. I have dealt with this frustration firsthand after a power outage caused ice to form around my bottom freezer drawer, leaving me wondering how to access my food without breaking something expensive.
This guide covers everything you need to know when your freezer drawer won’t slide, from quick fixes you can try in minutes to step-by-step troubleshooting for stubborn cases. Whether you own a French door refrigerator or a standard bottom freezer model, these solutions work across most major brands including Samsung, LG, Whirlpool, GE, and Kenmore.
Before attempting any repairs, understanding what causes a freezer drawer to stick helps you choose the right solution. Several common culprits can freeze your drawer in place, and each requires a different approach.
The most frequent cause of a stuck freezer drawer is ice accumulation around the glide rails or gasket seal. Moisture seeps into the tracks, freezes overnight, and effectively glues your drawer to the frame. This often happens after frequent door openings during humid weather or following a defrost cycle that did not complete properly.
Spills and debris find their way into the drawer channels over months of use. Crumbs, vegetable bits, and sticky residues from frozen juice boxes create friction that makes the drawer slides hard to move. The drawer may open partially but resist full extension when gunk builds up on the glide rails.
An overstuffed freezer drawer often leads to stuck drawers when items slip behind or underneath the basket. That frozen turkey you wedged in last Thanksgiving might now be pressing against the back wall, preventing the drawer from sliding forward on its tracks.
Years of opening and closing eventually wear down the drawer slide mechanism. Cracked plastic rails, bent metal tracks, or broken roller wheels can bind the drawer and prevent smooth movement. Users on appliance repair forums report screws backing out of drawer glide rails as a common mechanical failure.
Before diving into complex repairs, try these simple solutions that often resolve a stuck freezer drawer in minutes.
Empty the drawer completely. Remove all food items and ice packs first. This eliminates weight and allows you to see obstructions clearly. You will also prevent food from spoiling if you need to leave the door open during repairs.
Check for visible ice at the edges. Look along the sides and top of the drawer frame where ice commonly forms. If you see frost buildup, the defrost method described below will likely solve your problem.
Apply gentle wiggle pressure. Grip both sides of the drawer handle and apply steady pressure while gently rocking left to right. Never yank forcefully, as this can damage the glide rails or crack the drawer plastic. I learned this the hard way when my forceful pull snapped a drawer tab that cost $40 to replace.
Check behind the drawer for fallen items. Use a flashlight to inspect the gap behind the drawer basket. A frozen bag of vegetables or ice cube tray might be wedged there, blocking full extension.
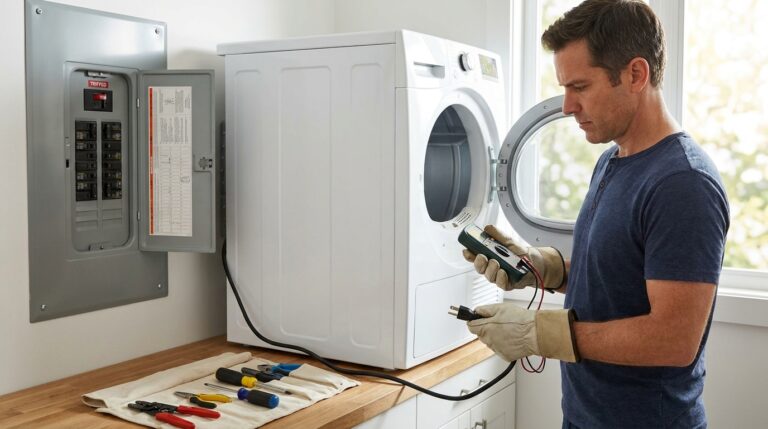
When quick fixes fail, follow this systematic approach to get your freezer drawer moving again. These steps work for bottom freezer refrigerators and French door models from all major manufacturers.
Remove every item from the drawer and examine the contents. Check for leaking containers that might have created sticky residue on the basket or rails. While empty, inspect the gasket seal around the drawer opening for cracks or tears that could allow moisture infiltration.
For drawers frozen shut by ice, you have two defrosting options depending on urgency.
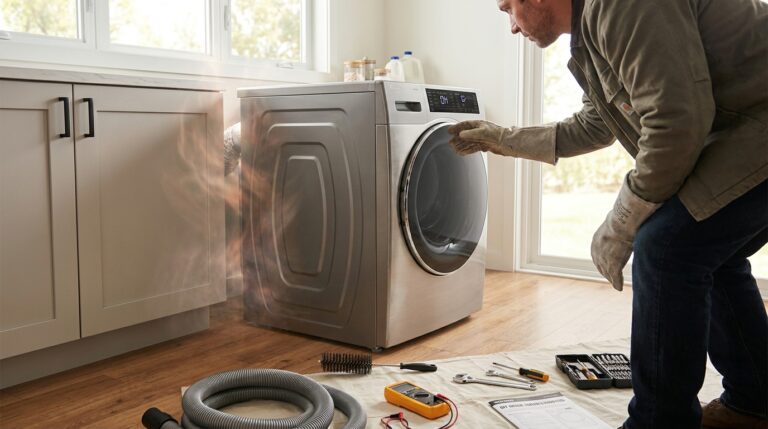
Hair dryer method (fast): Use a hair dryer on low heat setting and warm the edges of the drawer where it meets the freezer frame. Keep the dryer moving constantly to avoid overheating any plastic parts. Work slowly around all four sides for 5-10 minutes until the drawer releases. This method saved me during a dinner party when I needed frozen appetizers quickly.
Natural defrost (thorough): Unplug the refrigerator or turn off the freezer compartment. Prop the drawer open slightly if possible, or leave it closed and wait 2-4 hours for ice to melt naturally. Place towels on the floor to catch water. This approach works better for severe ice buildup but requires patience.
Once the drawer moves, remove it completely to access the tracks. Clean both the drawer-mounted glide rails and the fixed tracks inside the freezer cavity using warm water with a drop of dish soap. An old toothbrush helps scrub grooves where grime accumulates.
Dry everything thoroughly with a clean towel before reassembling. Any remaining moisture will refreeze and cause the same problem tomorrow.
Examine the glide rails for cracks, chips, or bent sections. Look at the roller assembly wheels to ensure they spin freely. Spin each wheel by hand; if any feel gritty or stuck, they need replacement. Tighten any loose screws you find, as these commonly back out over time and cause misalignment.
After cleaning and drying, apply a thin layer of food-safe silicone lubricant to the tracks. This prevents future sticking without contaminating your food. Avoid petroleum-based products that can degrade rubber gaskets over time.
Align the drawer rails with the freezer tracks carefully before pushing fully closed. Test the movement several times to ensure smooth operation. The drawer should slide with minimal resistance from fully closed to fully extended.
Sometimes you need to remove the drawer entirely to access the tracks or remove a stubborn obstruction. This process varies slightly by brand but follows general principles.
You do not need to unplug the refrigerator for basic drawer removal. However, if you plan to use water for cleaning near electrical components, unplugging adds safety. Never force a drawer that feels mechanically bound, as plastic parts crack easily under stress.
Many French door refrigerators feature tiered freezer baskets. Remove the upper basket before attempting to extract the main lower drawer. Look for release tabs on the sides of the upper basket; squeeze them together and lift upward to detach.
Pull the drawer out to its full extension point. Look for locking mechanisms or tabs on the glide rails where they connect to the freezer frame. Depress these tabs simultaneously while lifting the drawer slightly, then pull the entire assembly forward and out.
Position the drawer rails above the tracks at a slight angle. Slide the rear wheels into the track first, then lower the front until the rails engage. Push the drawer fully closed to verify proper engagement before loading with food.
The right lubricant makes a significant difference in how smoothly your freezer drawer operates. Choose products safe for food-contact areas and appropriate for cold temperatures.
Silicone spray designed for food processing equipment provides long-lasting lubrication without freezing or gumming up. Apply sparingly to a cloth first, then wipe onto the tracks rather than spraying directly. This prevents overspray on food-contact surfaces.
Small amounts of petroleum jelly work in a pinch, though they require more frequent reapplication. The jelly stays pliable in freezer temperatures and provides adequate lubrication for smooth drawer slides. Use a thin layer; excess attracts dust and debris.
Never use WD-40 or other petroleum-based penetrating oils on freezer drawers. These products leave residue that gums up in cold temperatures and can contaminate food. Vegetable oils also go rancid and create sticky buildup over time.
While most freezer drawer problems follow similar patterns, certain brands have known quirks that affect troubleshooting. If you need a new refrigerator, check our counter-depth refrigerator reviews for models with reliable drawer systems.
Samsung bottom freezer models commonly experience single-side sticking due to uneven rail wear. Check the right-side rail first, as this typically bears more weight. If the drawer opens partially then binds, the roller wheels likely need replacement.
LG refrigerators with Craft Ice or dual ice makers have additional wiring that runs along the freezer drawer rails. These wires sometimes tangle or disconnect, preventing smooth movement. Check wire routing if your LG drawer sticks intermittently.
Whirlpool models with in-freezer ice makers sometimes suffer from control arm interference. The sensing arm that detects ice levels can drop into the lower position and block the upper freezer basket. Verify the arm sits in the raised position before troubleshooting further.
GE French door refrigerators frequently experience gasket seal issues that lead to frost buildup and stuck drawers. Inspect the gasket groove carefully for tears or deformation. Starting at the corners, run your finger along the entire seal to verify proper seating.
Kenmore bottom freezer drawer slide rails wear out faster than other brands due to plastic construction. Replacement rails cost $15-30 and install with basic screwdrivers. Order by model number for proper fitment.
Some freezer drawer problems exceed DIY repair scope. Knowing when to call an appliance technician saves money and prevents further damage.
Contact professional service if you discover cracked or broken glide rails during inspection. Damaged rails can suddenly fail completely, dumping drawer contents and potentially injuring someone. Motorized drawer systems in high-end models require specialized knowledge to repair properly.
Expect to pay $100-200 for a service call plus parts if needed. Compare this against your refrigerator’s age and value before deciding. Units under warranty should always use authorized service to maintain coverage. Check your owner’s manual for warranty terms; many refrigerators include one-year full coverage plus extended sealed system protection.
Regular maintenance prevents most freezer drawer problems before they start. Establish these habits to avoid future frustrations with your mini refrigerator or full-size unit.
Spend two minutes each month checking the drawer tracks for debris or moisture. Wipe any spills immediately before they freeze. This simple habit catches problems while they are still easy fixes.
Keep the freezer drawer below 80% capacity to prevent items from pressing against the back wall or slipping into the track mechanism. Organize contents in bins to prevent small items from scattering behind the drawer.
Test the gasket seal monthly using the dollar bill test. Close a bill in the door and pull; you should feel resistance. If the bill slides out easily, the seal needs cleaning or replacement. Poor seals allow humid air inside that freezes on tracks.
Keep your freezer at 0 degrees Fahrenheit (-18 Celsius). Colder temperatures increase frost formation, while warmer settings risk food safety. Avoid frequent temperature changes that create condensation cycles.
Remove and clean the freezer drawer completely every three months. Wash the basket, vacuum the tracks, and reapply lubricant. This quarterly maintenance takes 15 minutes and extends drawer life by years.
Freezer drawers typically get stuck due to ice buildup around the glide rails, food debris in the tracks, overloading that pushes items into the mechanism, or damaged roller wheels. Moisture entering through a poor gasket seal freezes overnight and glues the drawer in place. Check for frost formation along the drawer edges and listen for grinding sounds that indicate mechanical problems.
Use food-safe silicone lubricant specifically designed for refrigeration applications. Apply sparingly with a cloth rather than spraying directly. Petroleum jelly works as a temporary alternative but requires more frequent reapplication. Avoid WD-40 and petroleum-based oils as they gum up in cold temperatures and can contaminate food. Never use cooking oils which go rancid and create sticky residue.
First, empty the drawer completely to reduce weight. Look for visible ice around the edges and apply gentle heat using a hair dryer on low setting. Move the dryer constantly to avoid overheating plastic. Try wiggling the drawer left to right while pulling steadily. Never yank forcefully as this damages the glide rails. If ice is severe, unplug the refrigerator and allow 2-4 hours for natural defrosting.
Align the drawer rails with the freezer tracks at a slight upward angle. Slide the rear roller wheels into the tracks first, then lower the front until the rails engage fully. Push the drawer completely closed to verify proper engagement. The drawer should slide smoothly without resistance from fully closed to fully extended. Test several times before reloading with food items.
For minor ice binding, a hair dryer applied for 5-10 minutes usually releases the drawer. For severe ice buildup, unplug the refrigerator and allow 2-4 hours for complete defrosting. Place towels on the floor to catch meltwater. Never use sharp tools to chip ice as this damages the freezer interior and voids warranties. Patience prevents costly damage to plastic components.
A freezer drawer that won’t slide disrupts daily life, but most problems resolve with simple DIY fixes. Start with the quick solutions outlined above, then work through the step-by-step troubleshooting if needed. Regular cleaning and proper loading habits prevent 90% of drawer issues before they occur.
If your freezer drawer remains stuck after trying these methods, the problem likely involves damaged glide rails or a mechanical failure requiring professional attention. Don’t force the drawer and risk expensive damage when appliance technicians can diagnose the issue affordably.
For 2026, keep these tips handy and maintain your freezer drawer quarterly to avoid future frustrations. A smoothly sliding drawer keeps your frozen foods accessible and your kitchen running efficiently year after year.